

WooCommerce is a strong choice for eCommerce because of its flexibility and control. However, it doesn’t offer features for wholesale and business customers.
That’s where the B2BKing plugin comes in handy. With B2BKing on top of the WooCommerce plugin, you can build a full-fledged B2B store with role-based pricing, bulk ordering, and other B2B operations of different sizes.
Confused about how you can configure B2BKing correctly on your WooCommerce store? This guide will help you get started!
In this tutorial, you’ll get a clear sequence of steps on how to set up your WooCommerce B2B store with B2BKing. Let’s jump right into it!
Key Features For a Successful B2B Website
Before we begin, let’s check out the key features for a successful B2B website. And guess what? B2BKing offers all of these features. Let’s go through them now!
- Custom Pricing and Tiered Discounts: B2B customers should order quantities with the prices they deserve. Undoubtedly, B2BKing offers flexible pricing options, like role-based prices, user-specific prices, bulk discounts, and tiered pricing with dynamic rules.
- Customer Roles and Account Management: B2B stores require customer accounts based on the user type and business structure, with permissions and buying roles. B2BKing lets you add customer groups with subaccounts (multiple buyers per account) and role-based permissions.
- Product Visibility Control: Not every product or price should be visible to all users. B2BKing lets you hide prices, restrict products, and control catalog visibility based on user, login status, or group.
- Bulk Ordering and Seamless Purchase Flow: B2B buyers place large and repeat orders. So, a B2B store must have a bulk ordering feature. Thankfully, B2NKing offers bulk order form, purchase lists, and quick ordering tools.
- Quote Requests and Negotiation System: B2B transactions usually involve negotiation instead of instant checkout. B2BKing lets you add this ‘request a quote’ system for quote requests, offers, and conversations.
Now, let’s start the tutorial with the things you need before creating a B2B store.
Things You Need Before Creating a WooCommerce B2B Store
Before beginning to build a WooCommerce B2B store with B2BKing, you need to have a few core essentials set. This includes your hosting, domain, theme, etc.
Most importantly, you must install and activate WooCommerce on your website. This adds the core functionality of an online store to your site.
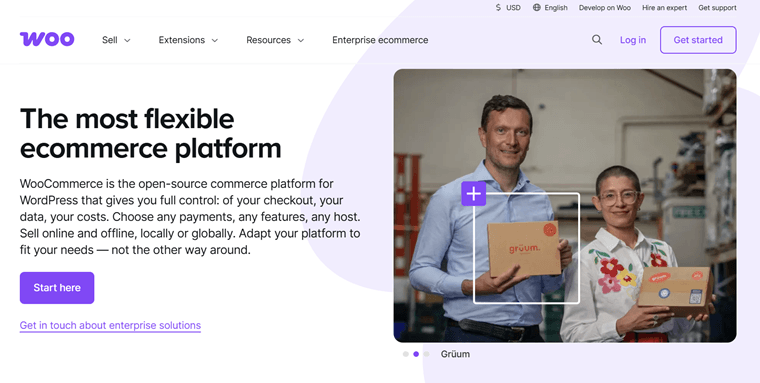
Notably, B2BKing works as an extension of WooCommerce, not a standalone plugin. So, WooCommerce provides the core eCommerce features like products, cart, checkout, and order management.
With that, B2BKing builds on top of this by adding B2B-focused features. This involves wholesale ordering, customer groups, etc.
Here’s a quick overview of the steps to add WooCommerce:
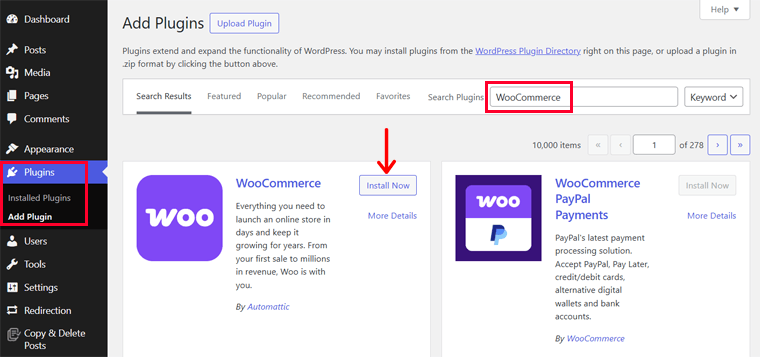
- Just go to your WordPress dashboard and navigate to the ‘Plugins > Add New’ menu. There, search for the ‘WooCommerce’ keyword.
- Once you find the plugin, click the ‘Install Now’ button.
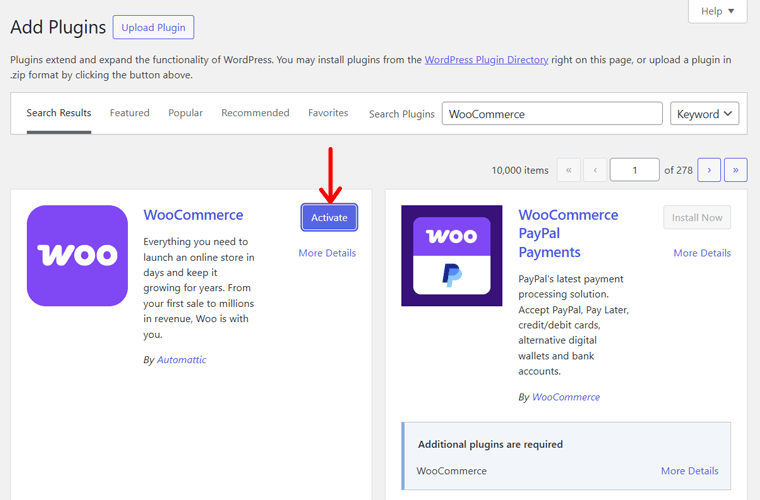
- Following that, hit the ‘Activate’ button.
- Next, use the guided setup process that involves everything from adding products to inserting shipping options.
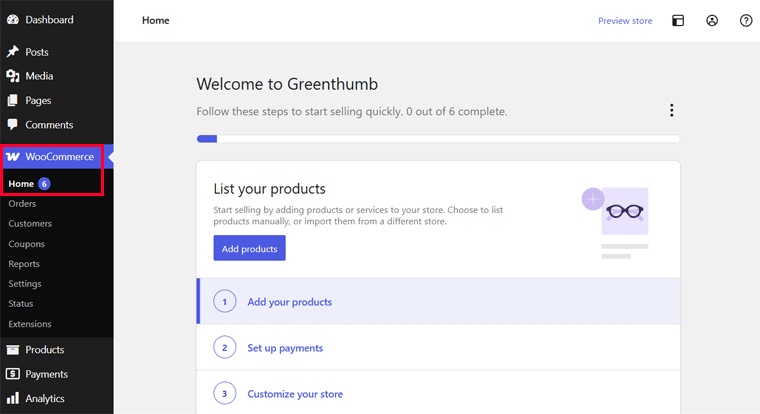
- Lastly, go to ‘WooCommerce > Settings’ and configure the settings. You’ll find options for products, shipping, payment, emails, site visibility, etc.
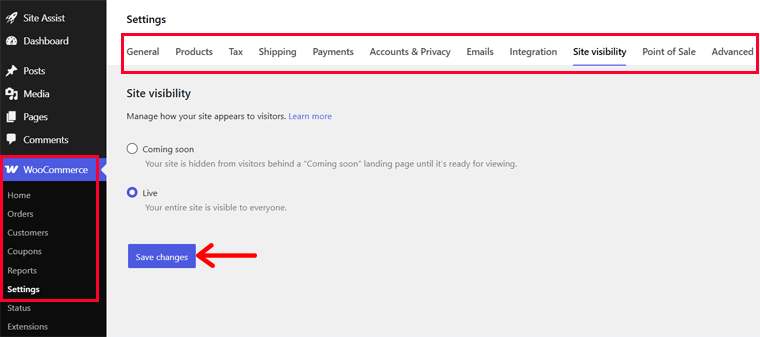
For a full guide, check out our tutorial on setting up a WooCommerce store.
With that, let’s move forward with the steps of using B2BKing.
How to Set Up a WooCommerce B2B Store with B2BKing?
Building a functional WooCommerce B2B store takes a series of steps. Thanks to B2BKing, you can seamlessly set up your B2B store with ease.
Follow the steps below to kickstart your B2B website now!
Step 1: Install and Activate B2BKing
First, you must install B2BKing with the version you prefer. Depending on your choice of a free or premium plan, follow the steps given below.
I. Free Version
The process of installing the free version of B2BKing is like any other free WordPress plugin. Similar to how we did for WooCommerce, simply navigate to ‘Plugins > Add New’ on the dashboard.
Then, search for the keyword ‘B2BKing’ in the search bar. Once you find it, click the ‘Install Now’ button.
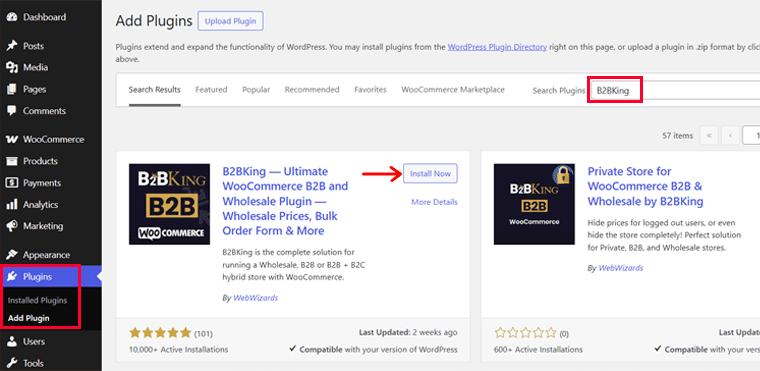
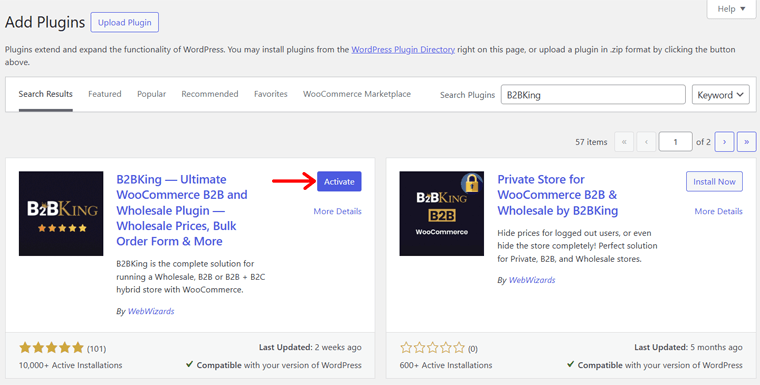
Right after that, hit the ‘Activate’ button. That’s all!
II. Premium Version
Planning to use the premium version for more advanced features? Here’s how you can purchase and install the pro plugin.
First, open the official B2BKing website. There, click the ‘Buy Now’ button present in the navigation.
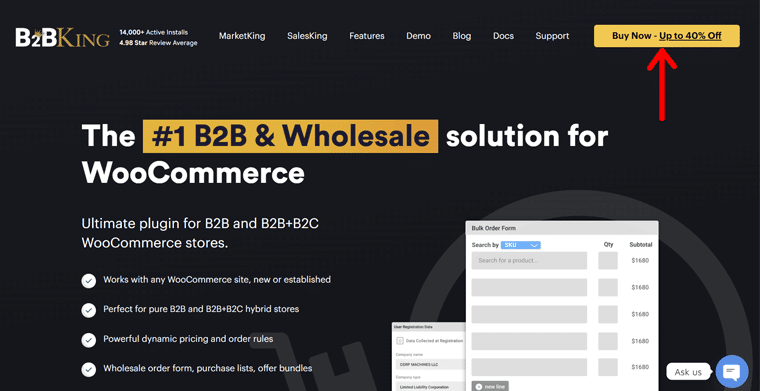
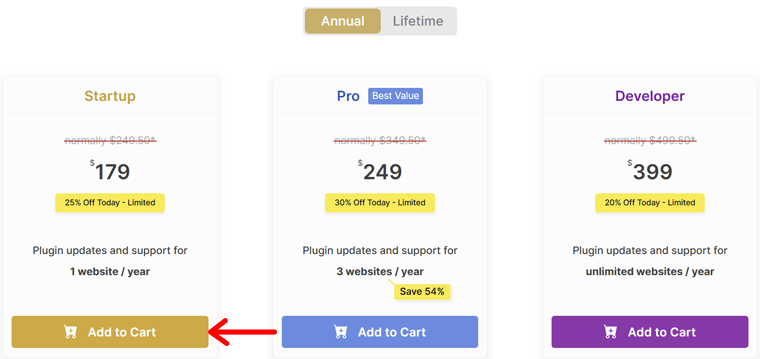
On the ‘Pricing’ page, you’ll find three pricing options with annual and lifetime options. Among them, choose the most ideal plan for your B2B store requirements. Just click the ‘Add to Cart’ button.
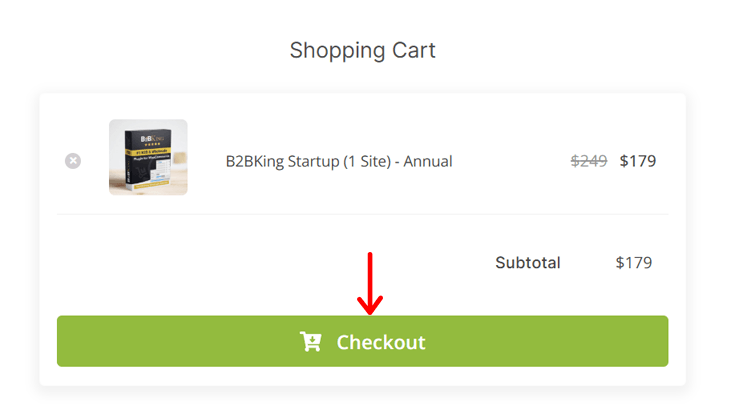
Next, you’ll be redirected to the shopping cart with the added plan of your choice. With that, press the ‘Checkout’ button.
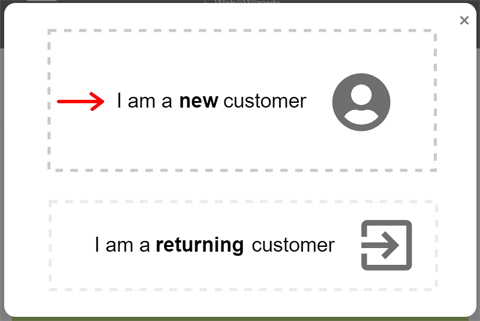
Now, you must ensure whether you’re a new customer or a returning customer. Suppose you’re a new customer. Then, create your account first. Otherwise, log in to your account and start the purchase.
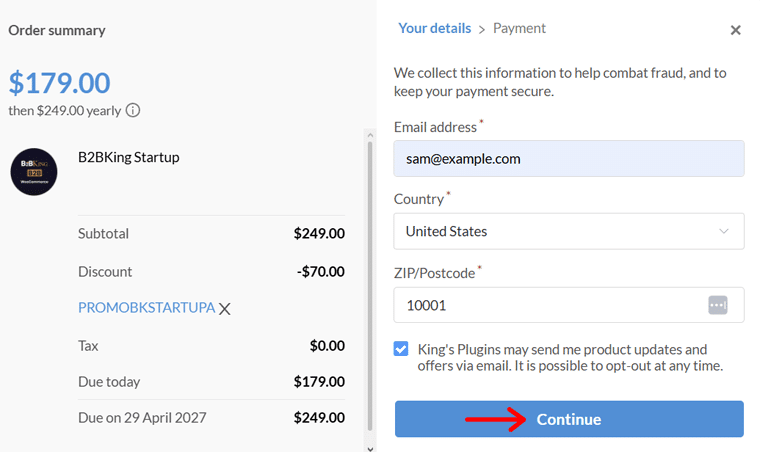
This involves entering your personal and payment details.
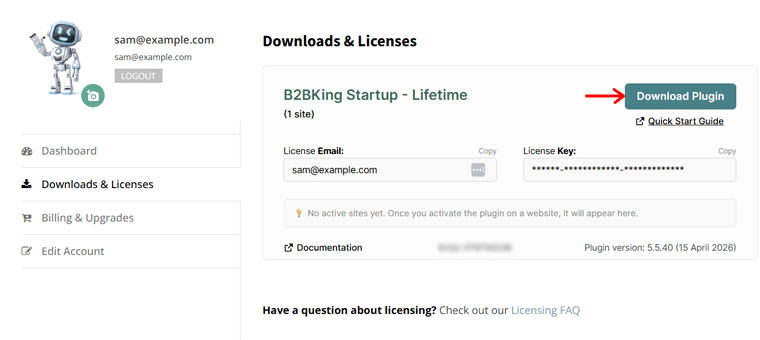
After you complete the purchase, open the ‘Downloads & Licenses’ tab on your account. There, hit the ‘Download Plugin’ button, which downloads the ZIP file of the paid plugin to your computer. Don’t forget to secure your license key.
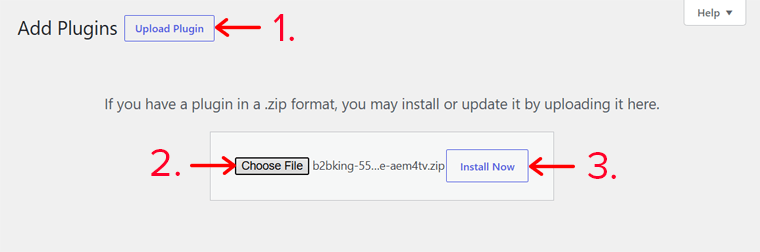
Moving forward, you can begin adding the plugin to your WordPress dashboard. Notably, you must have the free plugin installed before adding the paid one.
Once you do that, open ‘Plugins > Add New’ and click ‘Upload Plugin.’ Next, hit the ‘Choose File’ button and upload the downloaded file. Then, press the ‘Install Now’ button.
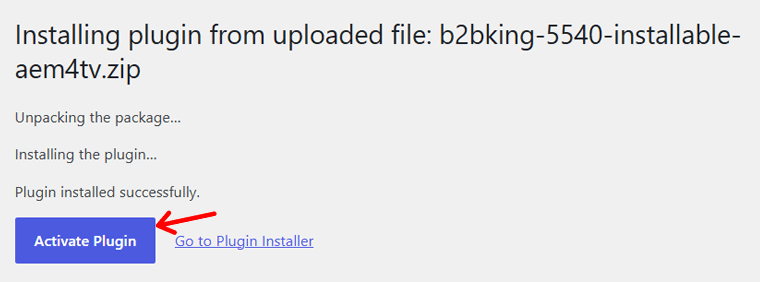
Once the installation finishes, click the ‘Activate Plugin’ button. Now, you’ll find the newly added B2BKing menu on the dashboard.
If your website doesn’t have the free plugin installed, then you’ll get a notification. Such a notification also shows up if your site doesn’t have WooCommerce. Once your site has all the essential WordPress plugins, activate the B2BKing license.

You’ll get a notice to do that, too. Just click the ‘Activate License’ button. Else navigate to ‘B2BKing > License’ on the dashboard.
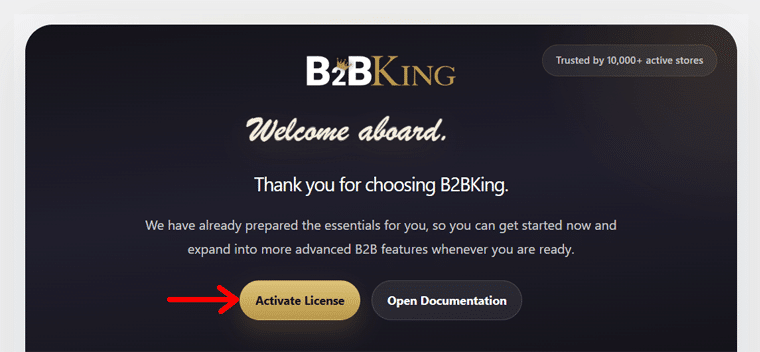
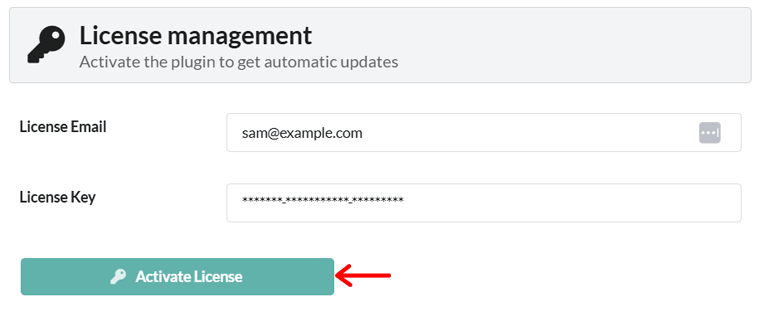
There, insert the license email and license key. Then, hit the ‘Activate License’ button. That’s just it!
Check out our comprehensive guide on how to install a WordPress plugin!
Step 2: Configure the B2BKing Settings
Following that, begin configuring the B2BKing plugin. This involves these steps:
I. Pick Your Shop Mode
First, go to ‘B2BKing > Settings > Main Settings.’ There, you can find a ‘Plugin Status’ setting with 2 different options. They are:
- B2B & B2C Hybrid: If you plan to sell to both businesses and individuals.
- B2B Shop: If you plan to sell only to businesses.
Here, let’s pick ‘B2B Shop.’ Simply put, the difference is that individuals won’t see the B2B-specific products when you use the hybrid mode. Features like bulk order forms and conversations won’t show up on the individual customer’s panel.

Don’t forget to click the ‘Save Settings’ button.
II. Enable the Required Shop Features
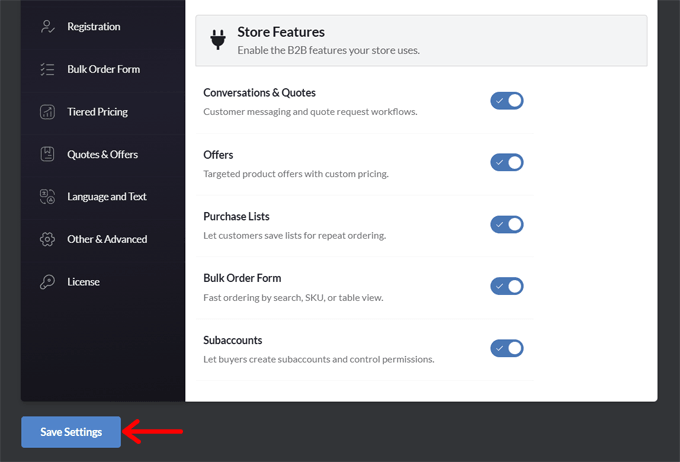
Below the shop modes, there’s a ‘Store Features’ setting. By default, all the plugin features available on your plan are enabled. As per your needs, you can disable them.
Moreover, these are actually the features your B2B users get on their account. Some of them include:
- Conversations and quotes
- Offers
- Purchase lists
- Bulk order form
- Subaccounts
Once you’re done, hit the ‘Save Settings’ button.
III. Access Restriction
Moving on to the ‘B2BKing > Settings > Access Restriction’ menu. Here, you can control the experience of your guest users. The options involve:
- Hiding prices even though the products are visible.
- Hiding the entire shop and its products.
- Hiding the website and forcing visitors to log in.
- Replace the prices with the ‘Request a Quote’ option.

Don’t forget to click the ‘Save Settings’ button.
Check out how each of these options works in this B2BKing documentation.
IV. Product and Category Visibility
Below the access restriction options, you’ll find the ‘Product & Category Visibility’ section. By default, the ‘All Products Visible’ option is enabled there.
Suppose you want to keep certain product items or categories hidden from certain users or groups. Then, pick the ‘Control Visibility’ option. Here, let’s pick this option. Once you’re done, hit the ‘Click to Save Settings’ button.
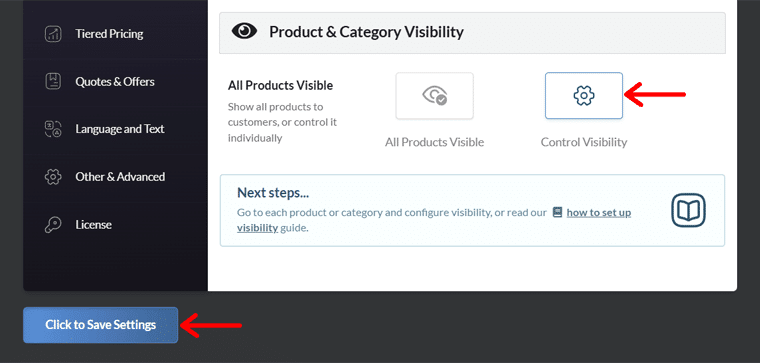
Now, you can manually hide the products and categories later on. Check out the process to do so in the B2BKing documentation.
V. Registration
When you open the ‘Registration’ menu setting, you can set up the registration process. First, you can keep the ‘Enable Dropdown & Fields’ option as it is. Enabling this feature shows a dropdown and fields on registration pages.
Next, configure the advanced registration settings. Here, you can:
- Add registration options at the checkout page.
- Let existing B2C customers become B2B customers with profile upgrades.
- Choose between manual and automatic approval of user registrations.
- Decide to provide a separate account page for business users.
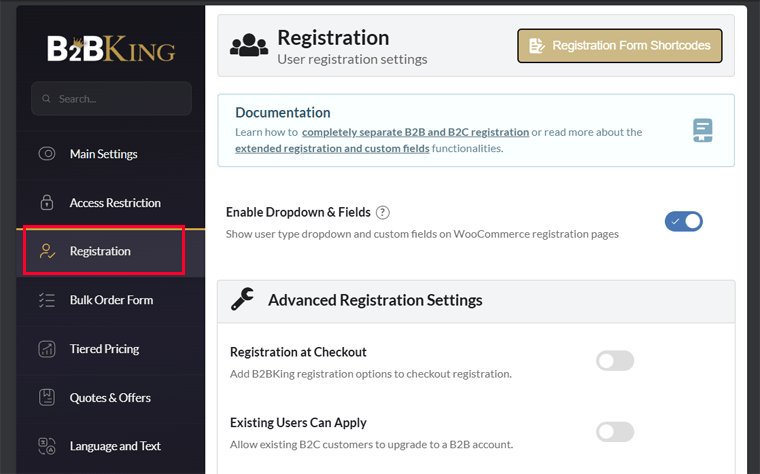
Don’t forget to click the ‘Save Settings’ button.
Here’s the B2BKing documentation for registration features.
VI. Bulk Order Form
Moving forward, open the ‘Bulk Order Form’ menu. There, you can adjust these:
- Theme & Design: Pick a theme for the order form and decide to show images.
- Search Settings: Enable or disable features, including search by SKU and product description. Allow search of item variations and view subtotals.
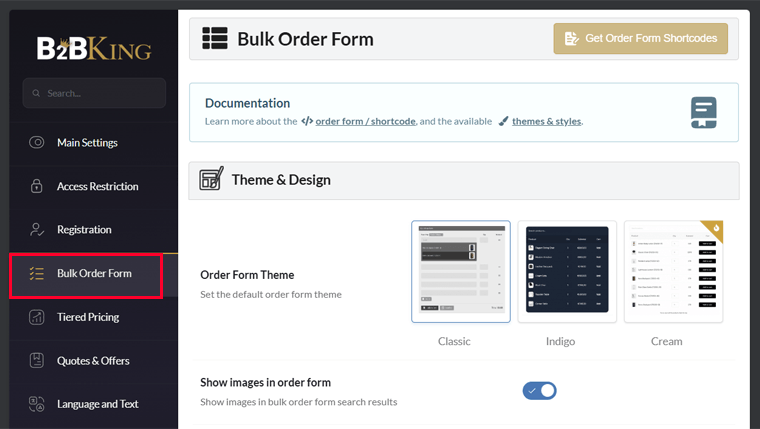
Once you’re done, hit the ‘Save Settings’ button.
VII. Tiered Pricing
Next, open the ‘Tiered Pricing’ menu. The tiered pricing feature lets you showcase different planning schemes for your products. So, you can show a tiered price range and set percentage discounts on the tiered prices.
In addition, B2BKing lets you show a tiered table. On the table, you can show a discount percentage, add colored price range values, and make the table clickable.
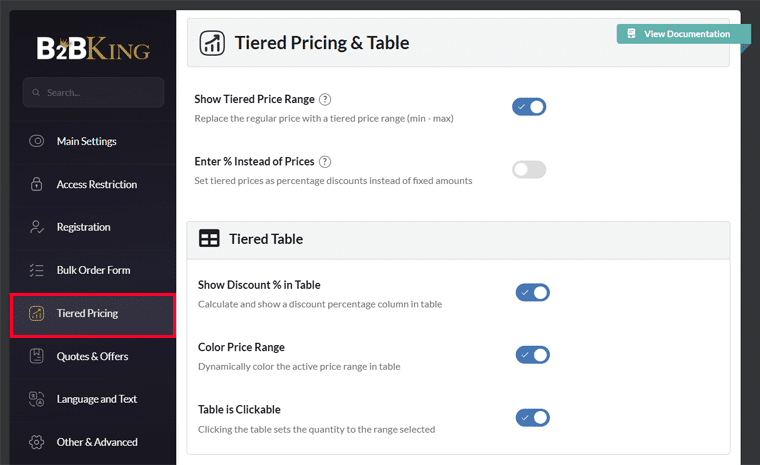
Save the changes after completing the adjustments.
VIII. Quotes and Offers
Then, you can open the ‘Quotes & Offers’ menu. Here, enable the ‘Request a Custom Quote’ button in the cart for your B2B customers, guests, or both.
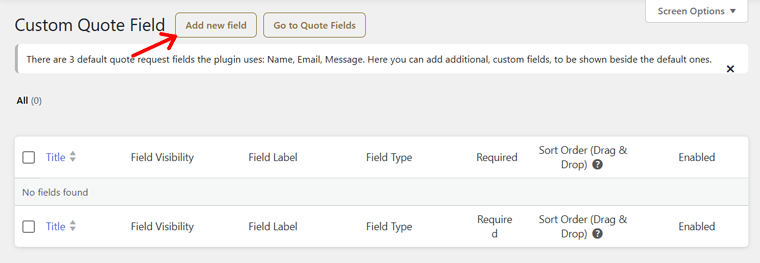
If you enable this feature, then you can hide prices in quote-only mode. Plus, manage the quote request form fields.
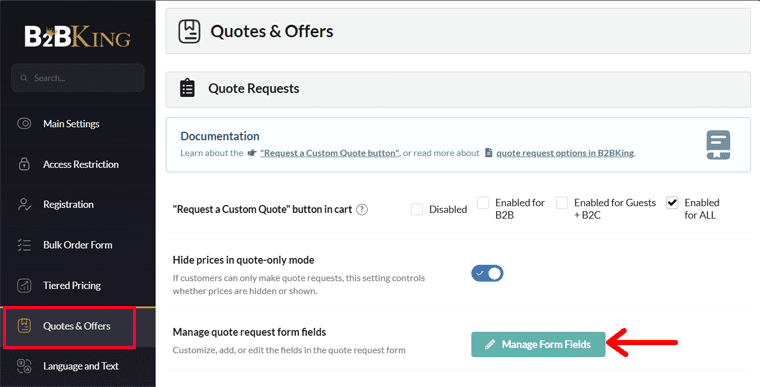
Just press the ‘Manage Form Fields’ button and click the ‘Add new field’ button.
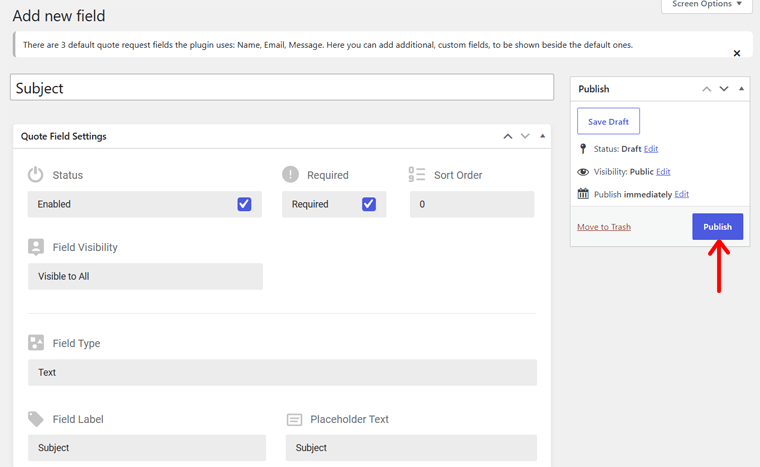
Next, insert the quote field title. Then, adjust the settings, including status, visibility, field type, field name, and placeholder text. Once you adjust the fields as you like, click the ‘Publish’ button.
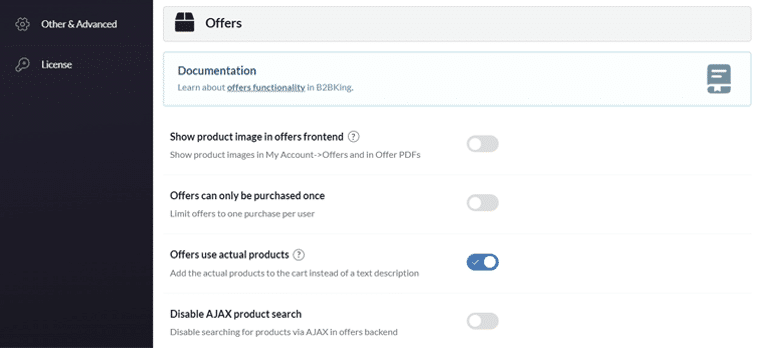
Going back to ‘Quotes and Offers,’ you can configure how you want to showcase your offers. The options are:
- Show product images of the offers.
- Offers purchase once or multiple times.
- Offers on actual products.
- Enable or disable AJAX product searchability.
- Lets you add a logo to the offer PDFs.
- Ability to insert thumbnail images of offers in the cart.
Once you finish making the changes, hit the ‘Save Settings’ button.
IX. Language and Text
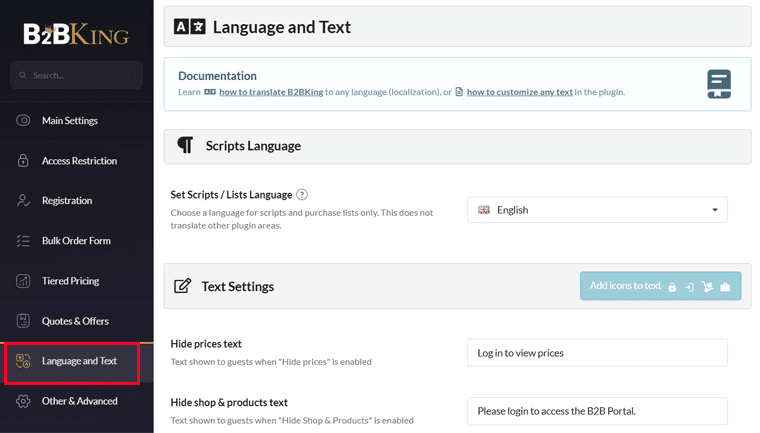
Moving forward, the ‘Language and Text’ menu has script and text language options. There, you can choose a language for scripts and purchase lists based on the nation.
Similarly, you can specify the text to be shown for various scenarios. This includes text for hiding prices and the shop, Inc. VAT, Ex. VAT, and more.
After making the changes, simply save it.
X. Other Advanced Settings
If you open the ‘Other & Advanced’ menu, then you’ll find several tabs. There, you can adjust settings for:
- Coupons
- Inventory
- Permalinks
- Multisite
- Price and product display
- And many more!
Explore them and configure the settings. Don’t forget to save the changes.

This ends the configuration steps. Now, move on to creating B2B groups.
Step 3: Create B2B Groups and Set Up Group Rules
Creating groups is a critical step in your B2B store. A user’s group determines their pricing, available methods, and various elements they get.
To add a group, navigate to ‘B2BKing > Groups’ on your WordPress dashboard. There, you’ll find the ‘Business Groups’ option. Now, click the ‘Business (B2B) Groups’ button.

By default, you’ll find a ‘B2B Users’ group, which denotes every individual business. You can open this and edit their payment and shipping methods.
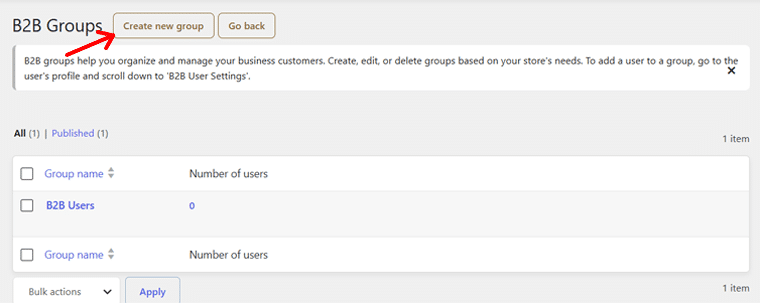
To add a new one, click the ‘Create new group’ button at the top.
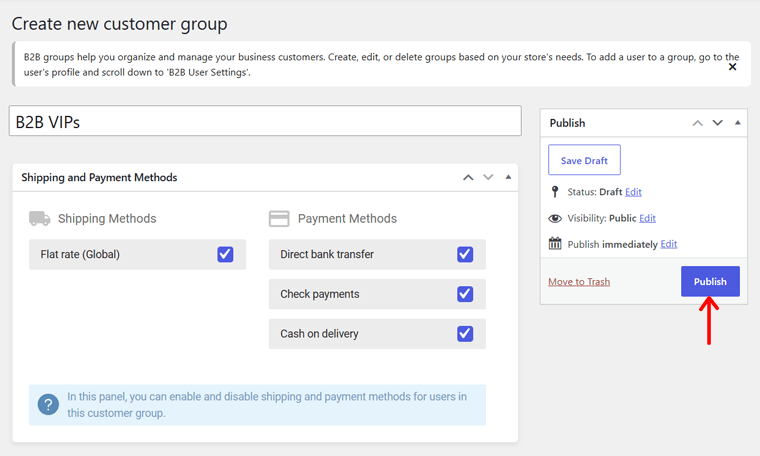
Now, provide a group name, for example, ‘B2B VIPs.’ Then, pick the shipping methods and payment methods for this group. Just tick the ones to include. Once you’re done, hit the ‘Publish’ button.
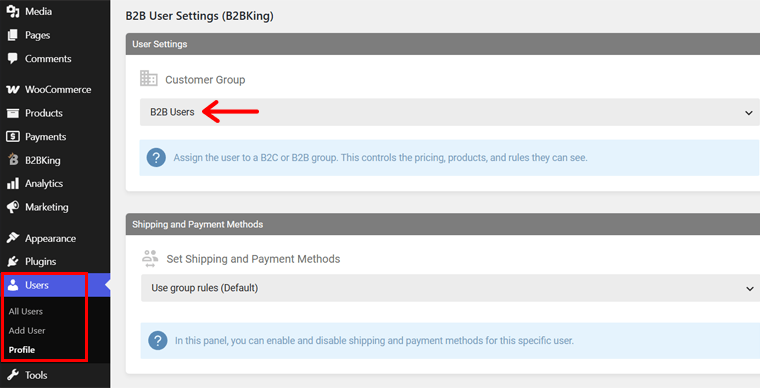
Following that, you must assign users to the group. For instance, let’s suppose you already have users added to your website. Now, we just need to assign the users to their respective groups.
Go to ‘Users > All Users’ and click ‘Edit’ on a user. Next, scroll down to the ‘B2B User Settings’ section. By default, a different group may be selected for the user. Instead, you can switch it to the ‘B2B Users’ group.
Once you’re done, click the ‘Update Profile’ button. Add as many groups as you want and add them to different groups as they must be.
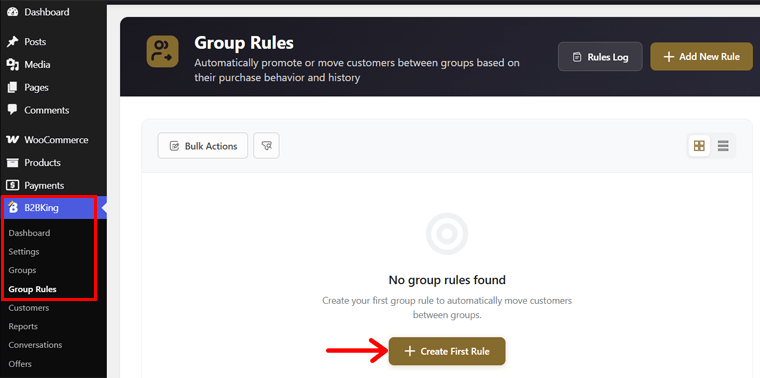
Moving on to group rules. Open ‘B2BKing > Group Rules’ and click the ‘Create First Rule’ or ‘Create new rule’ button.
With that, start adding the title for the group rule. For example, let’s use ‘B2B Users to B2B VIPs.’
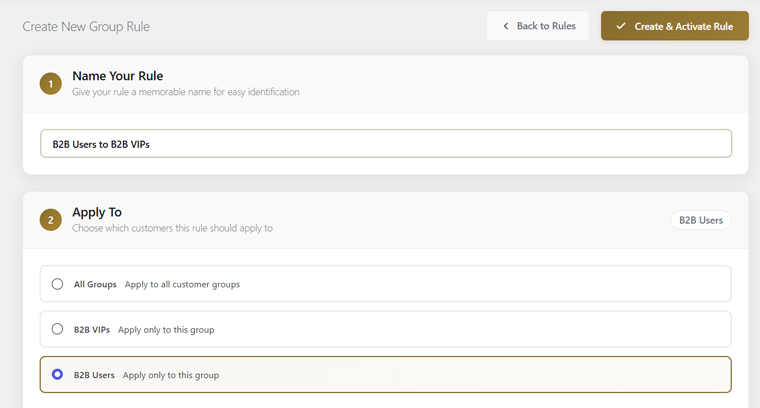
Then, fill out these rule details:
- Pick the group in which you want to apply the new rule. Here, it’s ‘B2B User.’
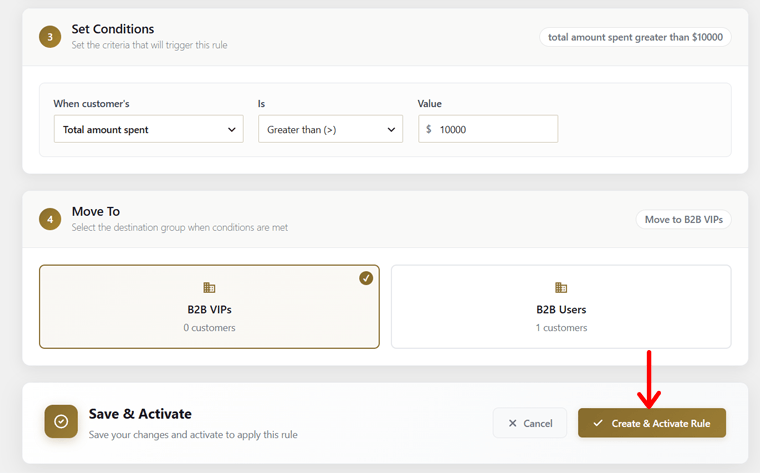
- Set the condition. Here, let’s select when customers’ ‘Total Amount Spent’ is ‘Greater than (>)’ the value ‘$10000.’
- Then, once the group meets the condition, move that user to another group. In our case, it’s B2B VIPs.
Next, hit the ‘Create & Activate Rule’ button. Now, add as many rules as you want.
Step 4: Add Products with Wholesale Prices
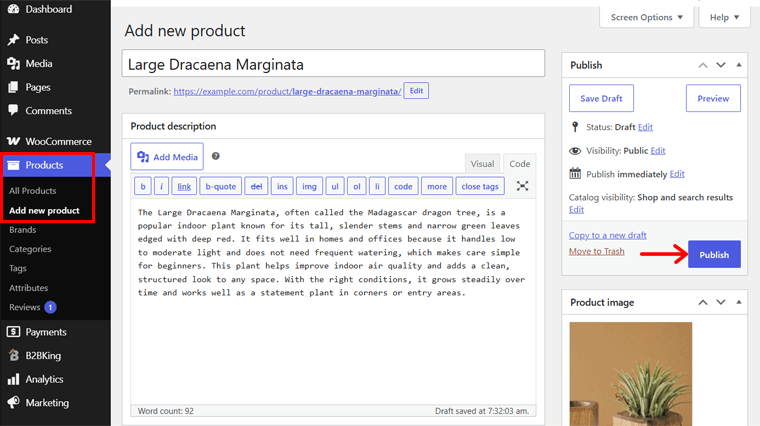
Following that, you can start adding your store products with wholesale prices. For that, navigate to the ‘Products > Add new product’ menu.
There, perform these actions like any other WooCommerce product first:
- Add the product name.
- Include the full and short product descriptions.
- Insert the product image or gallery.
- Add the product category, tags, and brand.
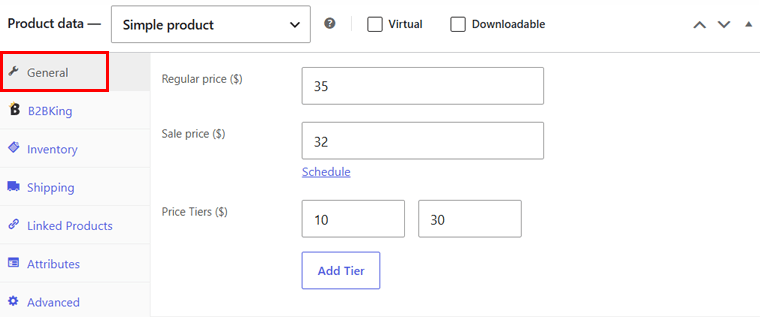
- Keep the regular price, sale price, and price tiers on the ‘General’ product data.
I. Adding Wholesale Prices
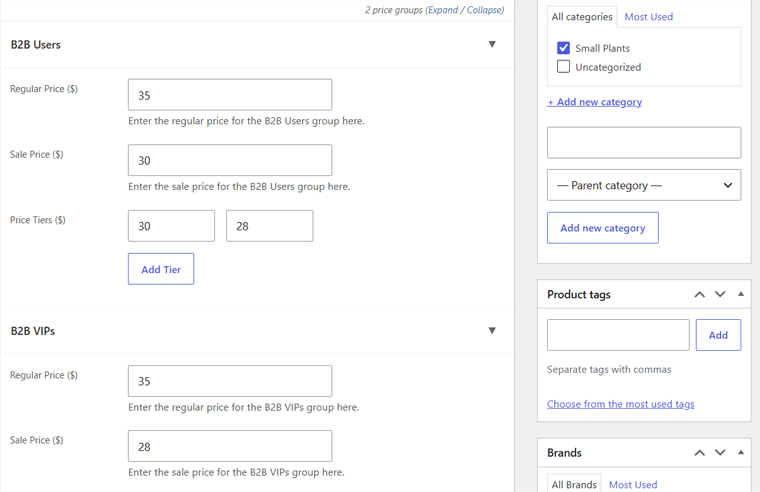
With B2BKing, you’ll now get additional options in the product data section. Moreover, you can insert the prices for each of the B2B groups you’ve added. Meaning, it lets you add regular price, sale price, and price tiers for each group.
II. Tiered Pricing and Other Tables
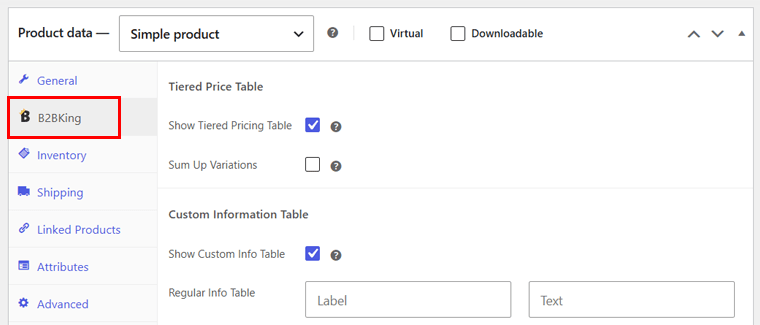
Similarly, you can configure other tabs, including inventory, shipping, attributes, etc. Other than that, open the ‘B2BKing’ tab. There, it lets you set up:
- Decide to show the variations table.
- Choose the location for the variation table.
- Decide to show the tiered pricing table.
- Show the tiered pricing table for each variation or sum it up.
- Show the custom information table for all users, and based on each group.
- Insert quantity rules for regular customers and groups.
III. Product Visibility
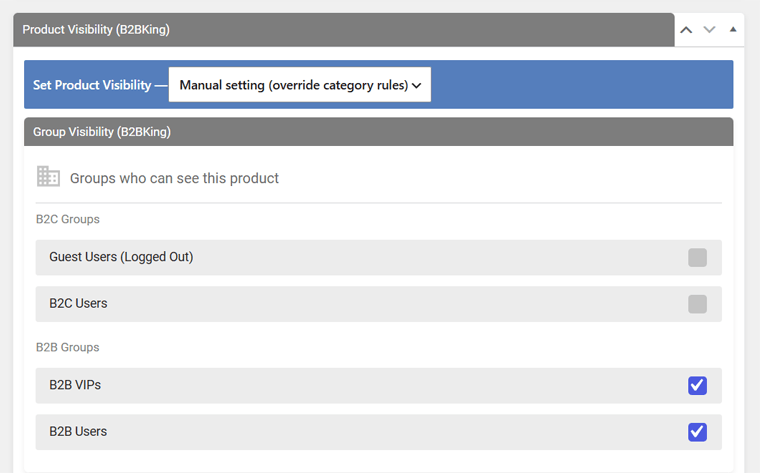
Scroll down to the end of this page. You can find the ‘Product Visibility (B2BKing)’ section. By default, your products are visible to all B2B customers and not individuals. You can keep it as it is.
Otherwise, pick ‘Manual setting (override category rules)’ on the ‘Set Product Visibility’ option. Next, select the B2B groups you want to make the products visible to. For example, let’s select the ‘B2B Users’ and ‘B2B VIPs’ groups.
Similarly, you can also set user-based product visibility. After setting this up, hit the ‘Publish’ button. Now, add more products and set prices, tables, and visibility.
Step 5: Start Conversations and Make Offers
Next, B2BKing features conversations and offers. The Conversations feature allows you to communicate with your customers. Simply put, you can respond to your customers’ quote requests, queries, or questions. Plus, they can also initiate it.
For example, let’s start a conversation. Just go to ‘B2BKing > Conversations’ and press ‘Start Conversation.’ Now, add the conversation title and pick the user.
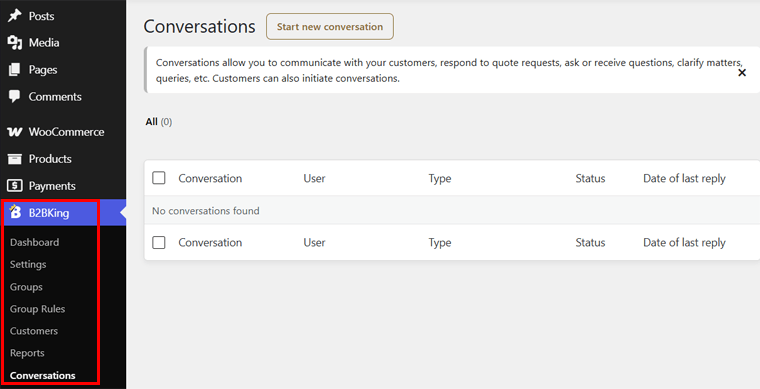
Then, select a conversation status among New, Open, and Resolved. Following that, enter the message and click the ‘Publish’ button. That’s it!

Similarly, the Offers feature lets you sell product bundles in different quantities at any price to your customers or groups. Here, you can offer deals or discounts.
To create an offer, simply navigate to the ‘B2BKing > Offers’ menu. There, hit the ‘Make offer’ button.
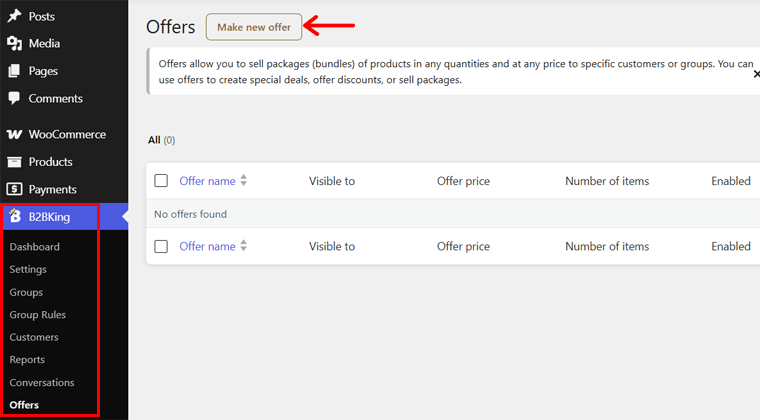
Now, add the offer title and ensure the offer status is enabled when you begin it. Next, complete these steps:
- Choose the groups that get the offer visibility.
- Add the specific user accounts that you want to offer or see this offer to.
- Enter the offer details. Add the product item, item quantity, and unit price. Then, click the ‘Add new item’ button.
- Type a custom description about the offer if you want.
Lastly, hit the ‘Publish’ button.
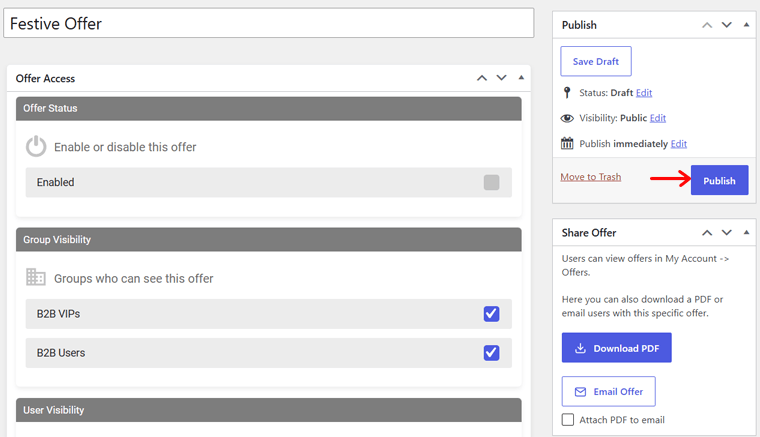
Step 6: Insert Dynamic Rules
If you need more granular control over your B2B store, then use dynamic rules. Here, you’ll get more options for your certain users, groups, and products. For example, offering discounts, hiding prices, setting minimum order quantities, etc.
To add a dynamic rule, go to the ‘B2BKing > Dynamic Rules’ menu. Then, press the ‘Create new rule’ button.
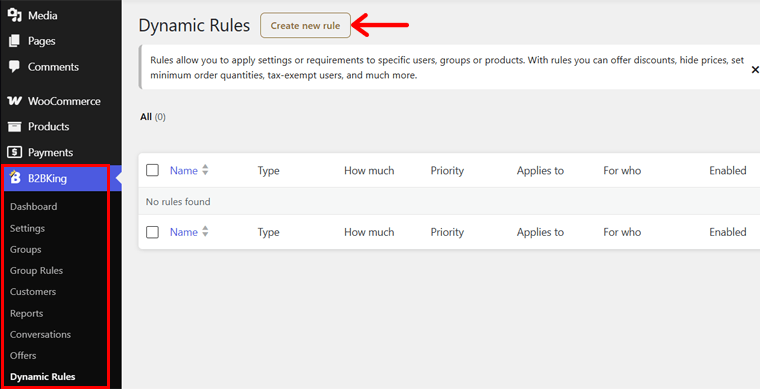
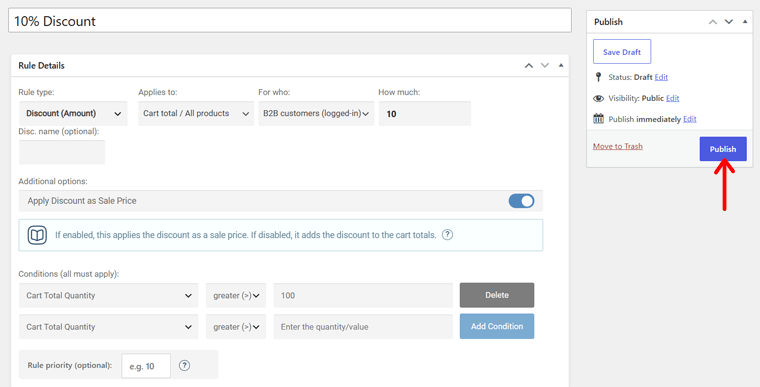
Similar to group rules, you can start adding dynamic rules. Give it a title; here, we’ll go with ‘10% Discount.’ Now, fill out the rule details:
- Select the rule type. For instance, let’s go with ‘Discount (Amount).’
- Pick the products, categories, or tags on which you want to apply the rule.
- Then, choose the target audience. Here, let’s pick B2B Users.
- Next, enter the discounted amount. Here, we’ll add ‘10.’
- Also, you can add the discount name.
- As we’re offering a discount for this example, you can choose to apply the discount on the sale price or the cart total.
- It also lets you set conditions. Let’s suppose the condition is on ‘Cart Total Quantity,’ which is greater than 100. Click the ‘Add Condition’ button.
Once you’re done, press the ‘Publish’ button to save the dynamic rule.
Step 7: Add Registration Roles, Fields, and Form
When a user registers for your B2B store, they can select their role from the given options. And you can create, edit, and delete roles as you want. That’s important because those roles show up in the registration form for the users.
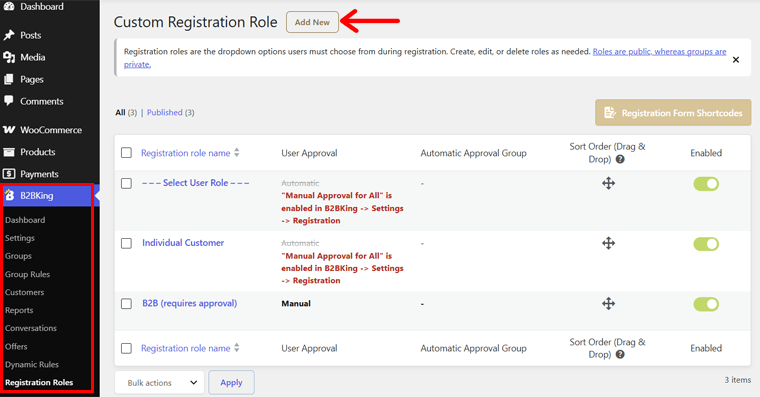
If you go to ‘B2BKing > Registration Roles,’ then you can find some default roles set by the plugin. They are individual customers and B2B. You can manage these existing roles to alter their status and approval approach.
Otherwise, you can also add new roles yourself. Just click the ‘Add New’ button.
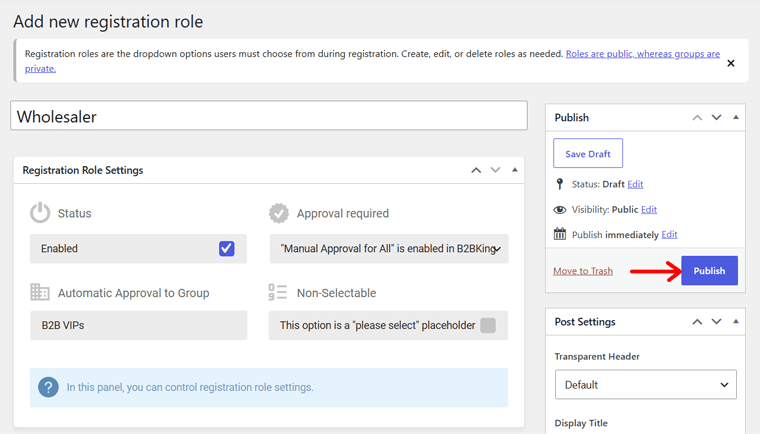
Then, add the role title, for instance, ‘Wholesaler.’ Next, adjust the role settings:
- Add or edit the custom fields to ask during registration for this role.
- Enable the status for the role to function.
- Choose if you want to manually or automatically approve users for the role.
- If it’s automatic approval, then pick which group the users will be added to.
- Enable the option if you want the placeholder for selecting the role.
After making these changes, hit the ‘Publish’ button.
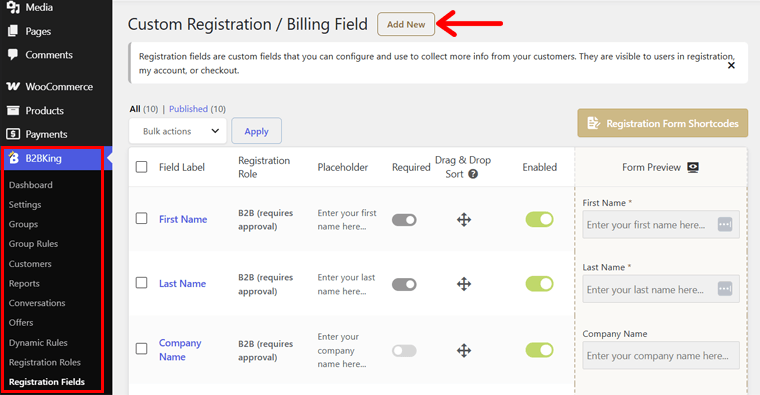
Moving forward, open the ‘B2BKing > Registration Fields’ menu. On this option, you can view, edit, delete, and add the registration fields for the form. Just manage the existing fields as you want first. Preview the form right there.
If you want to add a new field, then simply click the ‘Add New’ button.
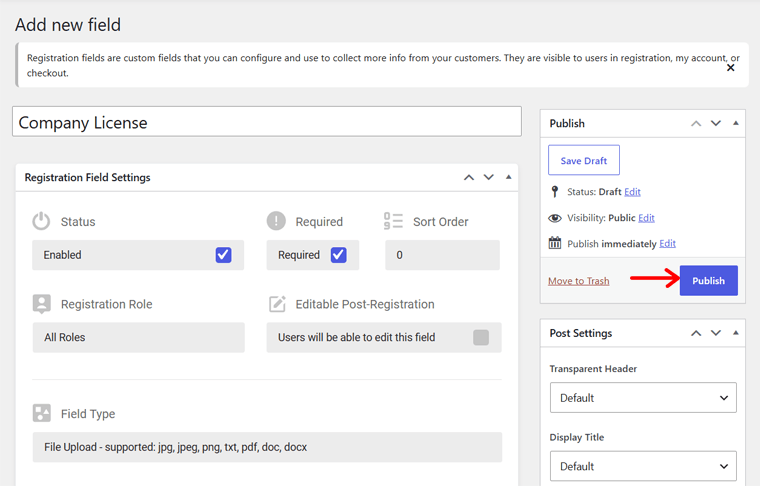
Now, perform these actions:
- Insert the registration field name.
- Adjust the field settings. Enable the field, specify if it’s a required field, choose the roles that’ll get this field, pick the field type, write the field label, adjust the placeholder text, etc.
- Configure the billing settings. Here, you can specify if the field has a connection with WooCommerce billing. Also, you can enable the custom field, make it required for billing, and select the groups that get the option.
Once you complete adding the field details, hit the ‘Publish’ button.
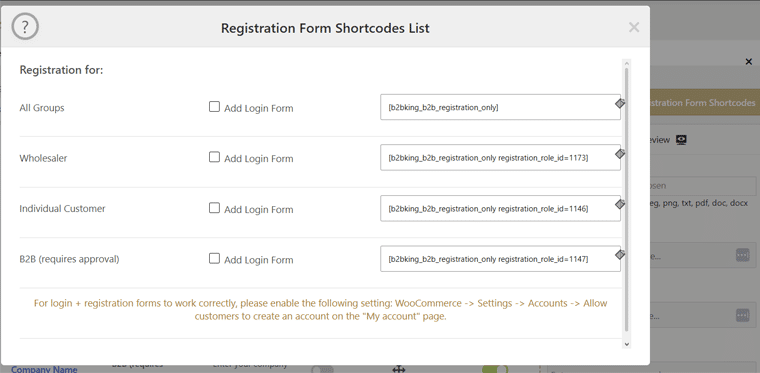
If you go back, then you’ll find the ‘Registration Form Shortcodes’ button.
This offers a list of all shortcodes that you can use to add a registration form for all groups or your specific groups. Plus, it can also provide a login form.
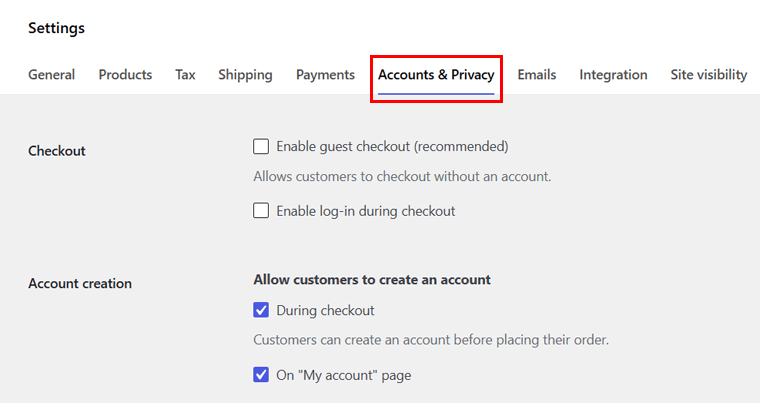
Actually, your registration form will be automatically added to your website if you allow customers to create an account. For that, navigate to ‘WooCommerce > Settings > Accounts.’
There, allow account creation during checkout on the ‘My account’ page. Plus, remove the guest checkout option. Save the changes once you’re done.
This adds the registration form right into the account page. However, if you want to show a specific form specialized for a group, then copy the shortcode and paste it on the page. But we recommend going with the default WooCommerce form.
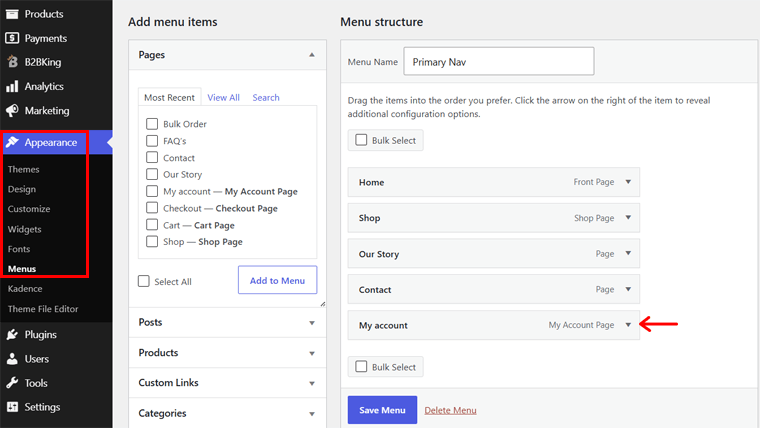
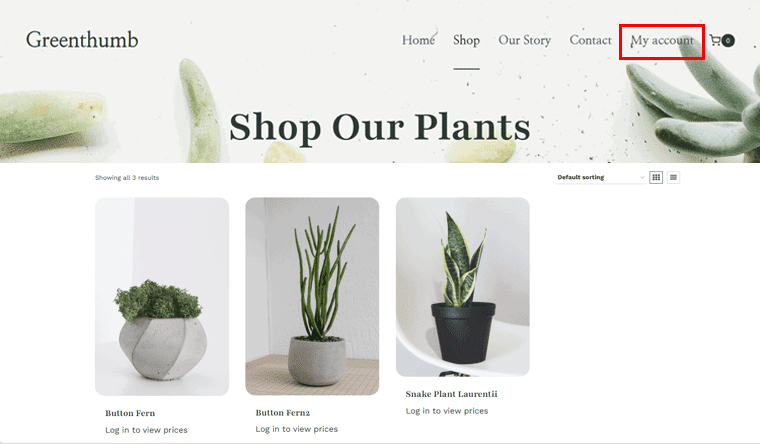
Further, don’t forget to add the ‘My account’ page in the navigation. This lets new visitors register and log into their account.
Step 8: Create a Bulk Order Page
Even if you enabled bulk ordering, this option won’t show up in your store itself. You need to navigate to the ‘B2BKing > Settings > Bulk Order Form’ menu.
There, click the ‘Get Order Form Shortcodes’ button.
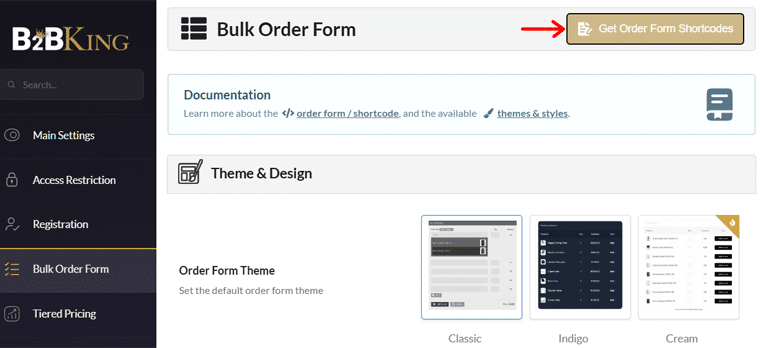
Following that, you’ll find various shortcodes based on the design options. Copy one of those shortcodes you want.
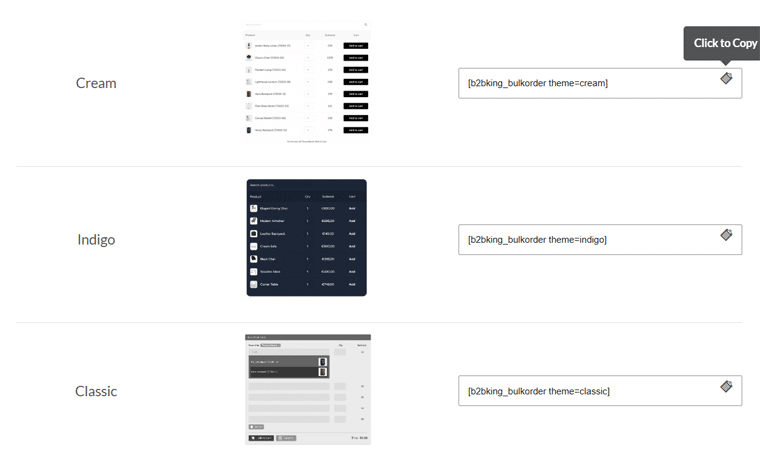
After that, go to the ‘Pages > Add Page’ menu on your dashboard. Name this new page, like ‘Bulk Order.’ Then, add the shortcode block and paste the copied shortcode. Lastly, hit the ‘Publish’ button to make the page live.
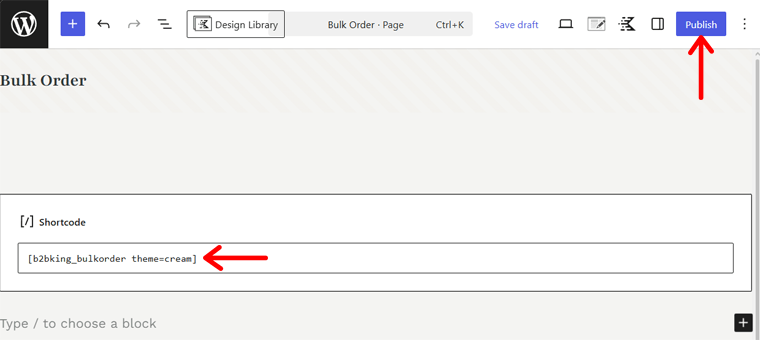
Note: The design of your B2B store and its pages differs based on the WordPress theme you’re using. Here, we’re using an eCommerce template by Kadence. You can also use any theme that’s compatible with WooCommerce and B2BKing.
Check out our complete guide on how to install a WordPress theme.
Step 9: Preview WooCommerce B2B Store
Congratulations, your new WooCommerce B2B store is now all set. Thanks to B2BKing! Now, you can preview the website to check its functionality.
As a new user, you’ll find that you can’t purchase or even view the wholesale products in the shop. So, you must register to be their business users. So, you can click the manually added ‘My Account’ option in the navigation.
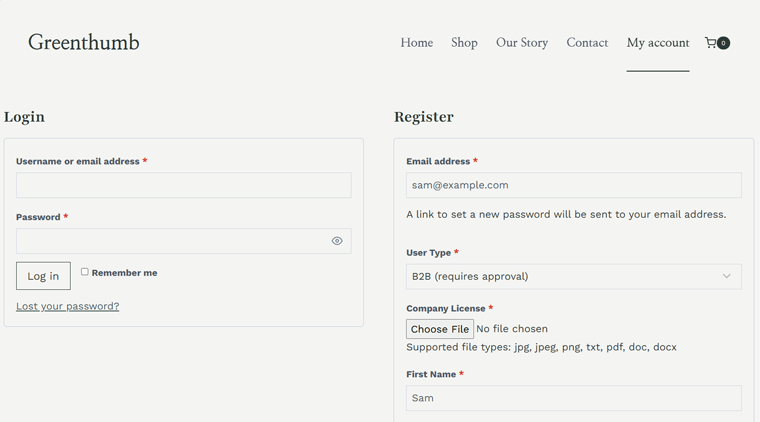
This redirects you to a page with the login and registration forms. First, you can enter your email and pick your registration role. For instance, let’s pick ‘B2B User.’ For this role, you have to enter your name, company details, location, etc.
Once that’s done, press the ‘Register’ button.
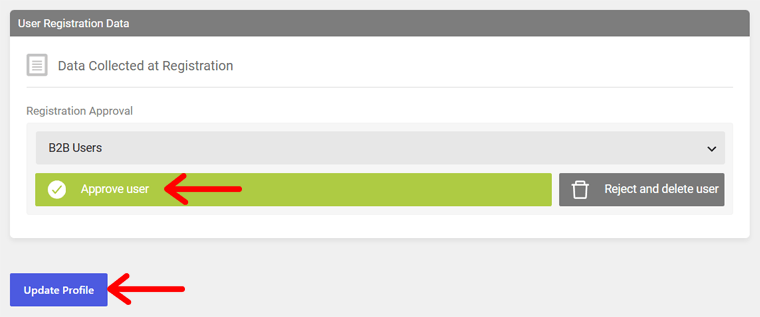
Now, the site administrator has to approve the request to be a B2B User. They just need to open the user details, click the ‘Approve user’ button, and update the user.
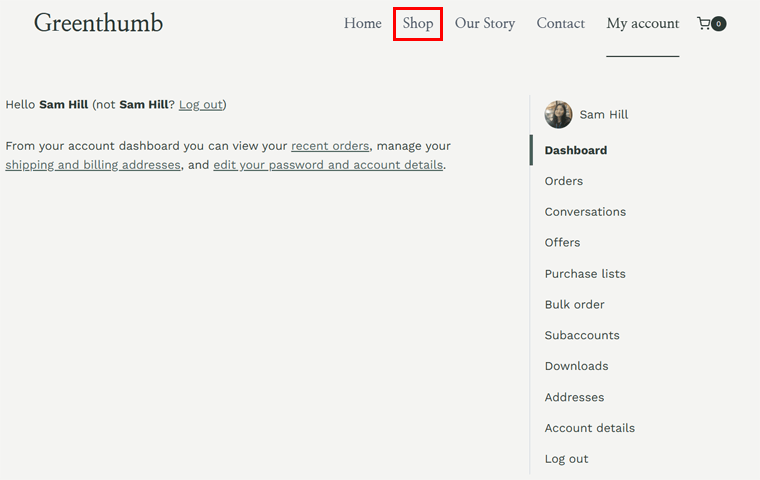
After the user changes their account password, they can preview their account. There, they can make orders, start conversations, check offers, place bulk orders, etc. With that, users can now open the ‘Shop’ page.
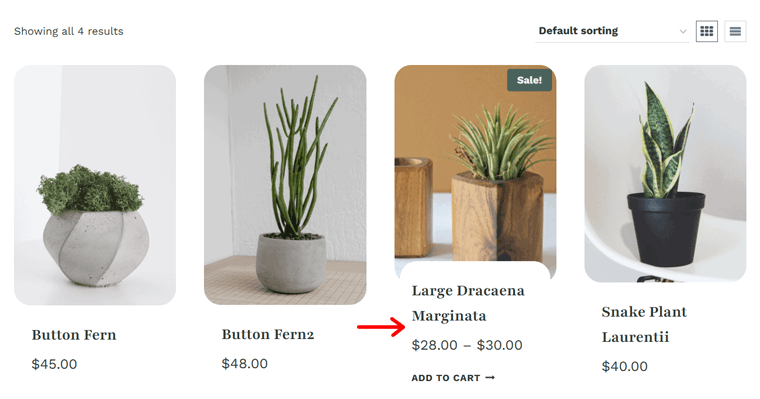
There, you can find the available products and click the ones for purchase.
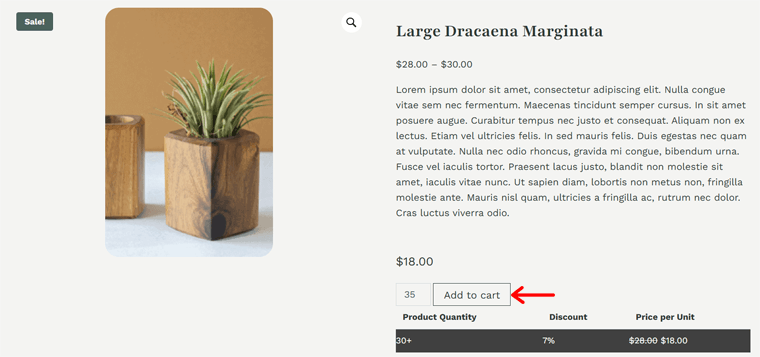
On the product page, you’ll find the rates for that product based on the group you’re part of, quantities one can purchase, and discounts available. Now, you can specify the quantity. Then, hit the ‘Add to Cart’ button, followed by ‘View cart.’
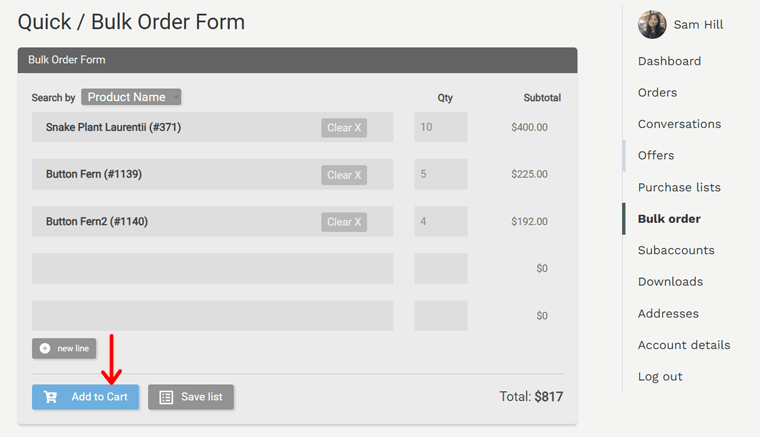
Moreover, you can also open the bulk order form and add multiple products to the cart at once. This bulk ordering page will let users search, filter, and add products of any quantity to their cart.
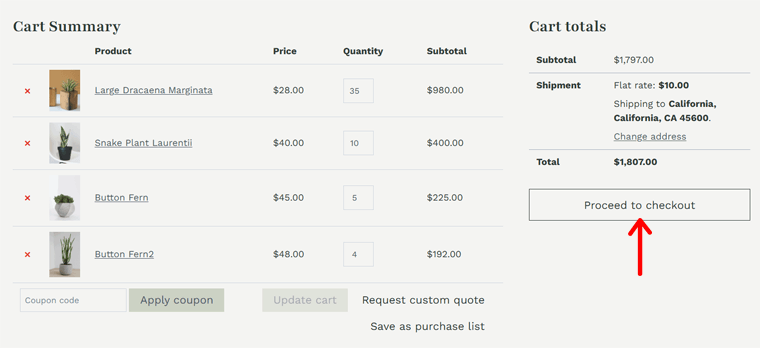
Now, go to the cart page. There, you can request a custom quote, save the cart as a purchase list, and enter a coupon code. Once your cart contains all your needs, hit the ‘Proceed to checkout’ button.
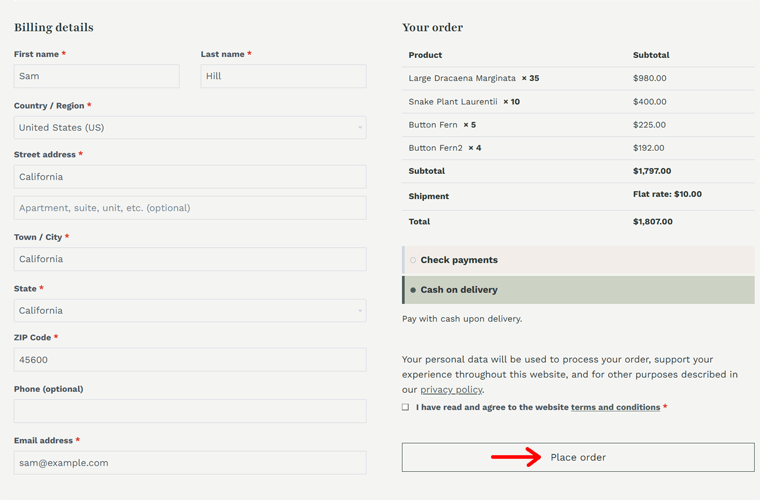
On the checkout page, users can add their billing details and choose the payment method that they’re offered. Once that’s done, click the ‘Place order’ button.
And there you have it! A complete B2B store customized as per your needs!
You can also check out our complete review on B2BKing if you want. Here’s a comprehensive guide on how to create a website from scratch.
Frequently Asked Questions (FAQs)
Check out the answers to your common questions about B2BKing.
1. Will B2BKing stop working on my website if I don’t renew the subscription?
No, B2BKing won’t stop working on your website if you don’t renew the subscription. Meaning, the plugin will remain functional, and your data will stay safe. You won’t get new plugin updates and access to its premium support.
2. Is there a free trial or live demo of B2BKing?
B2BKing offers a live demo to try its functionalities. However, there isn’t any free trial. But it offers a 14-day money-back guarantee policy. So, if you want to discontinue using the plugin within 14 days, then you’ll get a refund.
3. Can I upgrade to a different plan even after purchase?
Indeed, you can upgrade your license to a different plan even after purchase at any time. The price of the upgrade depends on the license type, i.e., lifetime or annual.
4. What’s the difference between the plugin available on the website and CodeCanyon?
The plugins and features on the website and CodeCanyon are identical. But the lifetime licenses on CodeCanyon offer 6 months of support at a higher price due to commission. So, we recommend purchasing it right from the official website.
5. Can I purchase B2BKing without a subscription?
Of course, you can purchase a subscription and later cancel it even after purchasing B2BKing. The best way is to get the plugin with lifetime updates and support.
Wrapping Up
That’s all that we’ve got here!
Congratulations on setting up your WooCommerce B2B store with B2BKing!
If you’re stuck, then mention your queries in the comment box. We’ll gladly help.
Meanwhile, check out our other guides on the best eCommerce builders and the best B2B WordPress plugins. Also, check out how to create a membership website.
Lastly, don’t forget to follow us on Facebook and X for more updates.


Leave a Reply