


Are you looking for an unbiased Kirki review? Or do you want to know how to use the Kirki website builder? Then this post is just what you need.
Creating a website is no longer a hassle with all these drag-and-drop builders. Kirki is designed to give you complete creative control without needing a single coding skill. It simplifies building professional, high-performing websites.
Moreover, if you want to create a site from scratch, no worries! Kirki offers pixel-perfect design capabilities, responsive layouts, and built-in SEO tools. All of that within the familiar WordPress environment.
So, in this Kirki review, we’ll explore how it can help you easily create stunning websites.
Let’s get started!
A. What is Kirki All About? Overview
Whether you’re building from scratch or using its pre-built templates, Kirki gives you pixel-perfect control over layout, typography, animations, and even SEO.
Moreover, it’s not a standalone SaaS. Kirki is a WordPress-native builder. This means it works inside the WordPress environment. All you need to do is install the plugins and start creating pages.
If you’re someone working with WordPress, then Kirki is the new approach for you.
We’ll talk about this in detail later, so stick with us.
Key Features of Kirki
- Add fun movements and actions to your website, such as making things move when visitors hover over them.
- Create, organize, and manage dynamic content directly within the platform with a built-in Content Manager feature.
- Crop, flip, and rotate images using a built-in tool, as well as draw shapes or custom paths with the Vector pen, and edit them visually.
- Easily convert your Figma designs into live WordPress websites by copying and pasting design elements directly into Kirki.
- Get access to pre-made utility pages like login, registration, 404, etc.
- Easily change how your text looks by picking different fonts, sizes, and styles.
- Make your website look good on computers, tablets, and phones with side-by-side breakpoint views on an infinite canvas.
Whatever site you want to build, a personal blog, a portfolio, or a business site, Kirki is right here for you.
We’ll discuss these features in detail in the features section below. Before that, let’s quickly get a glance of its pros and cons.
B. Pros & Cons of Kirki
Even though this plugin seems to be the best website builder, it has pros and cons.
Pros of Kirki
- Infinite canvas and freeform positioning.
- Figma to Kirki migration.
- Dynamic content manager.
- Real-time collaboration and co-editing.
- Advanced interaction builder.
- Global styling with Variables.
- 100+ template options.
- Pre-built pages, sections, and components.
Cons of Kirki
- Learning curve if you’re not familiar with Kirki.
C. Deep Dive into Kirki Features
Now that we know what Kirki is, let’s dive deeper into its features.
1. Infinite Canvas and Side-by-Side Breakpoints
Most builders lock you into a single, fixed view of your page. Kirki doesn’t.
Its Infinite Canvas lets you zoom in to focus on the details, zoom out for a bird’s-eye view, and even pan sideways. You can also place elements wherever you want by setting any element’s position to Absolute or Fixed.
Kirki also shows every screen size side by side. By default, you get 4 preset breakpoints: desktop, tablet, mobile landscape, and mobile portrait. Edit one, and you can see how the others respond without switching back and forth.
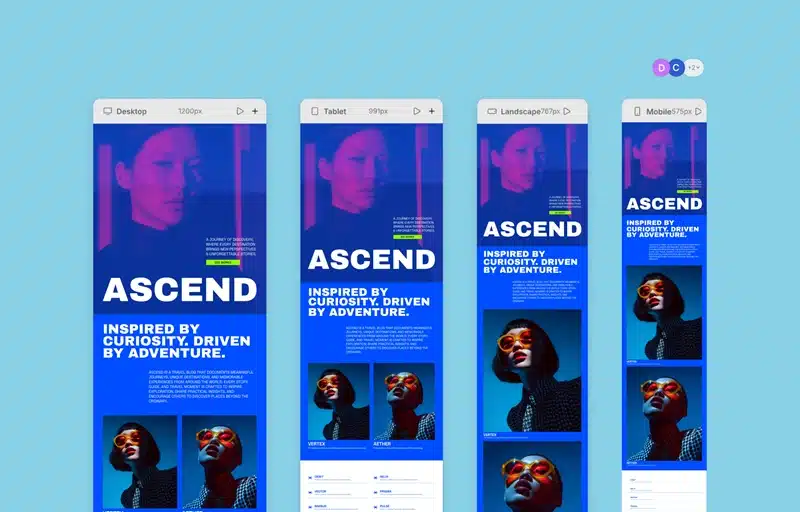
And you’re not stuck with just these presets. Kirki supports unlimited breakpoints, which most builders don’t allow. To add one, click the ‘plus’ icon at the top-right corner of any viewport, give it a name and width, and click ‘Done.’ Repeat to add as many as you want.
2. Template Library
Kirki offers a growing library of templates that lets you create a site without building from scratch. From your WordPress Backend, go to the Kirki dashboard and select ‘New Page’.
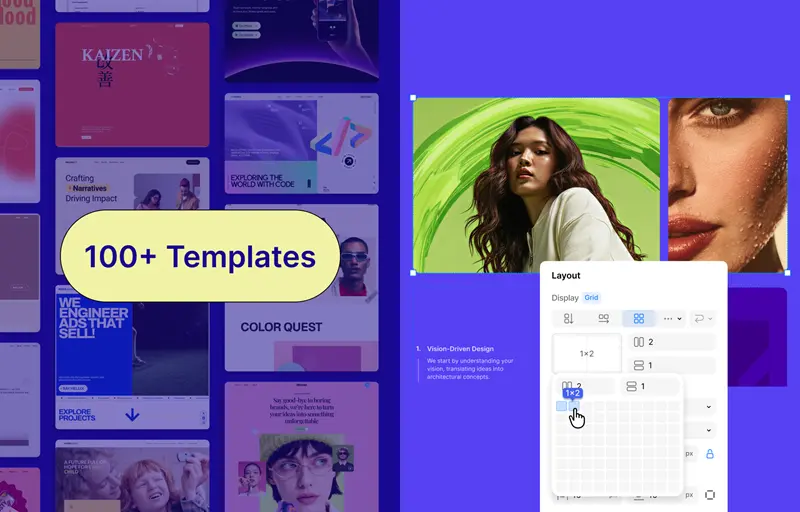
Right after the Kirki editor opens, click on the ‘Templates’ option on the left panel.
There are many templates for portfolio, agency, food & restaurant, etc. Simply find the one you like and click on it to view its details.
Following that, click the “Use this!” button to begin the import process.
A Template Overview popup will appear, showing what the template includes. Click ‘Proceed’ to confirm the import.
All templates come with essential pages such as Home, About, Services, and Contact. It’s the quickest way to get your site online.
You can edit everything in the template, from content to design. You can also edit the site header and footer from the Components section. Once you’re satisfied, hit the ‘Launch’ button, and that’s it.
3. Built-in Dynamic Content Manager
Next is Kirki’s built-in Dynamic Content Manager. It allows you to create, manage, and dynamically display custom content types, like blog posts, team members, and listings.
To use it, click the ‘Content Manager’ icon on the left panel in the Kirki editor. Here you can create your custom Collection.
A Collection in Kirki is a set of related content items you can manage and display on your website. To create a collection, click the ‘Add New’ button.
From the dropdown menu, you can choose to create a new collection from scratch or start from the presets. For example, let’s use the ‘Team Member’ preset to create a collection showcasing your team.
Then click the ‘Add New Item’ button. Now, enter the member’s name, slug, email, job title, and other information. Once done, click on the ‘Save’ option, and you’re done.
Likewise, you can create other collections as well.
4. Figma to Kirki
Already have a design in Figma? You don’t need to rebuild it from scratch.
The Figma to Kirki tool converts a static Figma design into a pixel-perfect, auto-responsive website, with no coding involved.
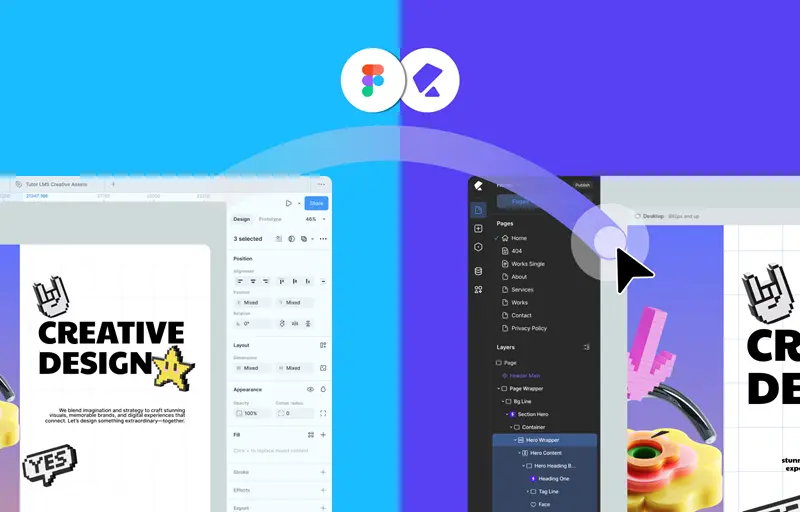
To install the plugin, open any Figma design, go to ‘Actions > Plugins & Widgets’, and search for ‘Figma to Kirki’. Select ‘Figma to Kirki (WordPress)’ from the results, then click ‘Run’.
Once it’s installed, select the entire design or a section, then click ‘Generate & Copy’ in the plugin. Finally, open the Kirki editor and paste it directly onto the canvas.
Next, when pasted, the design becomes editable Kirki elements. You can style them, add interactions, and adjust each breakpoint like any other page.
5. Real-time Collaboration
Building a site with a team shouldn’t mean passing files around.
In Kirki, you and your teammates can collaborate in real-time and co-edit the same page together. Everyone just needs an account with editor-level access.
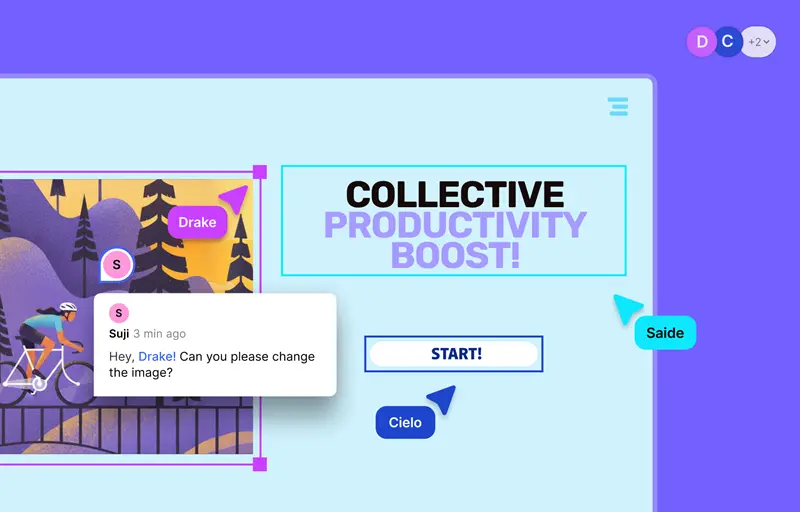
You can also leave feedback right where the issue is with In-Canvas Comments. Click the speech bubble icon in the Island at the bottom of the editor, click the spot on the page you want to flag, type your comment, then click the down arrow to post it.
And in case at any point something doesn’t work out, Publish History lets you restore an earlier version. To view and restore a previous version, click the clock icon at the top right corner of the editor.
6. Interaction and Animation
Website interactions are crucial for a good user experience. They guide attention, give visitors feedback, and make a site feel alive. Whether it’s a simple hover effect or a complex animation, the right motion keeps visitors engaged and makes your website memorable.
Kirki gives you two ways to add it.
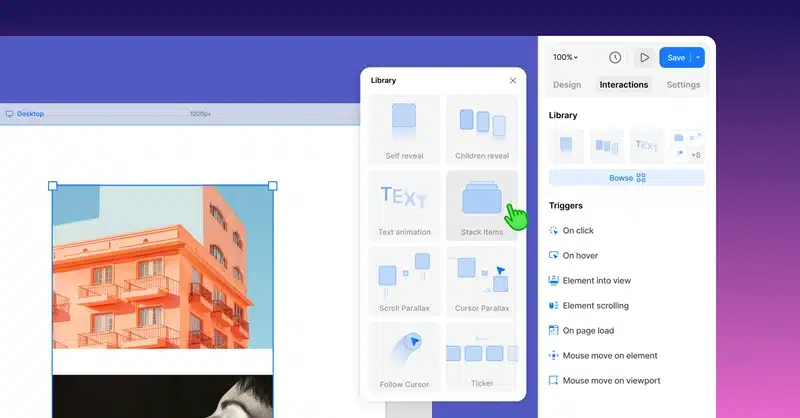
Start with the ‘Interaction Library’. It has ready-made animations you can apply in a few clicks. Add entrance effects to any element or its child elements, set up scrolling effects, animate text, and more.
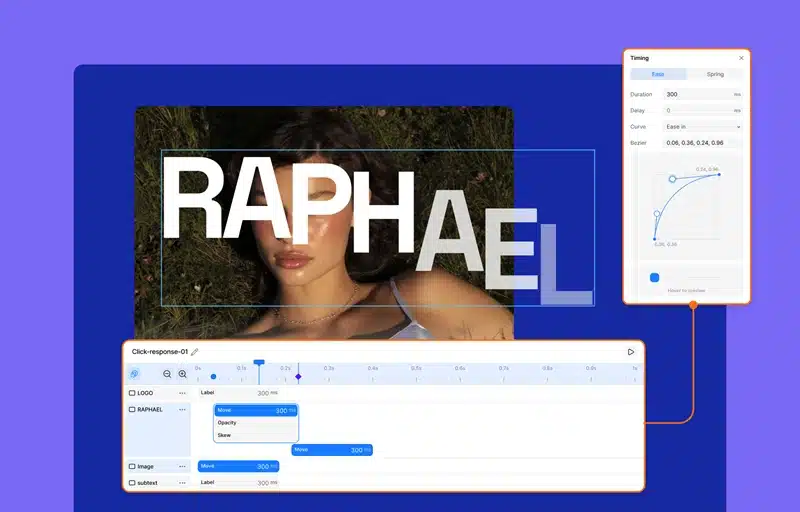
When you need more control, use the ‘Interaction Timeline Editor’. It lets you craft complex animations visually, so you can see how everything plays out and fine-tune it without guesswork.
Together, they cover everything from a quick hover effect to a multi-step animation, so you can build whatever you imagine all without touching a single line of code.
7. Global Styling With Variables
Changing the same color or font across dozens of elements is slow and easy to get wrong. Variables fix that.
A Variable lets you store a value once and reuse it across your site. Update the Variable, and every element using it updates too. In Kirki, you can save Colors, Numbers, and Font Families as Variables, as well as bundle your typography into reusable Text Styles.
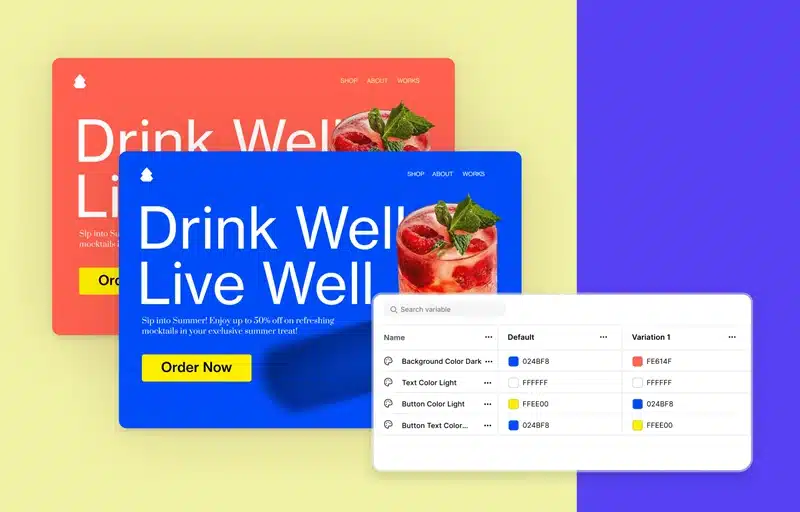
To create a Variable, click the ‘Variables’ icon in the left sidebar and pick a category: Colors, Numbers, Font Family, or Text Styles. Then select an element and, from the Right Panel, link the Variable to any matching property.
Variables also support modes. A mode is an alternate set of values for the same Variables, like a Dark Mode palette alongside your Default one. Click ‘Add Mode’ to create one, then set a value for each Variable in its column.
To use a mode, select a section or the whole page and choose it from the variable mode icon next to the layer name. You can also let visitors switch modes themselves, like a Dark Mode toggle, using an Interaction.
8. Form & Popup Builder
Kirki offers a large collection of form elements that you can use to build both simple and complex forms.
First, click the plus (+) icon on the left panel to open the Insert menu. Here, either grab one of the prebuilt forms in the ‘Forms’ section or go to ‘Base Elements > Forms’ and use the form elements available to build one from scratch.
Next, you can customize the form according to your preference. You can change its height, width, color, typography, and more. You can also edit the page in the same way. Once you’re satisfied with the form and page, click ‘Save’ in the top-right corner to apply your changes.
Kirki also has a built-in Popup Builder. Popups are designed the same way as your pages, with no extra plugins needed. They have no URL of their own, and they show up on the pages you target.
To create one, open the ‘Pages’ panel, click the plus (+) icon, and select ‘Popup.’ Add content from the Insert panel, then style it from the Design tab in the Right Panel.
Then use the Popup settings in the Right Panel to control how it behaves. Set a trigger, a delay with Show After, how many times each visitor sees it with Show Count, and more.
When you’re ready, click ‘Save,’ then publish it by clicking the ellipsis icon next to the popup in the Pages panel.
9. Essential Elements
In Kirki, Elements are the building blocks of a webpage. You can easily configure and customize them with the available options.
In this section, we will briefly review the ‘Insert Panel’ and show you how to add an element, style an element, and more.
To access Elements, click the plus (+) icon on the left panel. Here, you’ll see the prebuilt blocks, media elements, base elements, and more.
Elements like buttons, cards, and forms come ready to use, so you can drop them in, customize the style, and update the content without worrying about their structure.
Or you can start from a clean slate with ‘Base Elements’, which give you the raw building blocks to structure and style yourself.
In total, Kirki offers 28 different elements covered in the 4 categories:
- Structural elements
- Media elements
- Form elements
- Advanced elements
To add one, click and drag it to where you want it on the page.
10. Typography & Font Library
Typography is the art of arranging type to make words readable and visually pleasing.
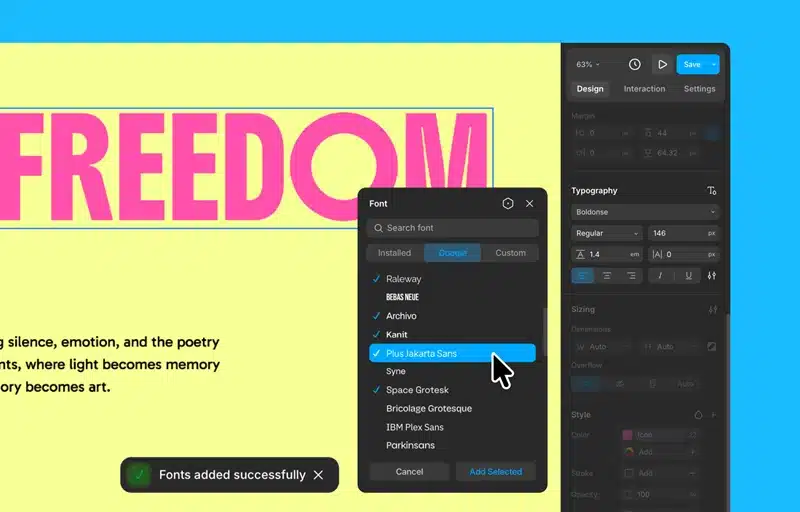
To adjust the typography of any element, go to ‘Typography’ in the Design tab of the Right Panel. Here, you can pick a font from the drop-down list, then adjust its size, weight, line height, and letter spacing.
You’re also not limited to the fonts in the list. The Font Library lets you add Google Fonts to your project or upload your own Custom Fonts unique to your brand. Once added, they show up in the font drop-down so that you can apply them to any element just like the defaults.
There are also ‘Advanced Typography’ options, such as Decoration, Indentation, Word Break, Text Overflow, and more, which you can access by clicking the settings icon in the bottom right corner of the Typography section.
Finally, from the ‘Style’ section, you can adjust a font’s color, stroke, and opacity.
11. SEO & Open Graph Settings
In the Kirki editor, you can also enable the Audit tool from the Kirki main menu, which will then appear at the top right corner of the canvas.
This feature helps ensure your site follows basic SEO standards. If you’re missing anything, then it’ll appear here. Let’s go through some of them.
i. Alt Text Missing
Alt text is crucial for visually impaired users, as it lets screen readers describe image content. It supports accessibility compliance and improves SEO by giving search engines relevant content descriptions.
So, this option in the Kirki editor checks media elements, like images, videos, etc., that lack alternative text. When you hover over them, the affected media will be highlighted.
So you can simply go to the settings of the highlighted media and add the suitable alt text.
ii. Link Missing
Likewise, the link missing option checks for link blocks without valid URLs assigned. Click on it to see which links are missing, such as a button or nav link on your page.
If a link is missing, then simply select that element, find its settings in the right panel, and click the link icon to add it.
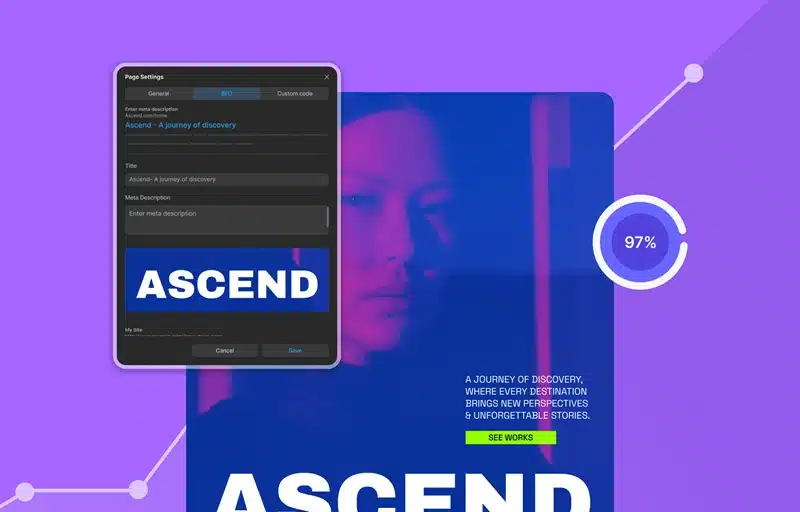
iii. Meta Description Missing
A meta description on a page is crucial. It’s a summary of your content that appears in search engine results. A well-written meta description improves click-through rates by attracting users with compelling and relevant information.
It also boosts SEO by including target keywords, making it easy for search engines to understand your page’s content, and playing a key role in driving organic traffic.
Now, in the Kirki editor, if any of your pages have a missing meta description, it’ll be seen in the Audit option. Click on it, and it’ll open a dialogue box to add your meta details for that page.
The preview section shows the live changes, just like the WordPress Gutenberg editor. Once you’re done, hit ‘Save’, and that’s it.
iv. Open Graph Setting
Next up is Open Graph. This title and description are the snippets that appear when your page is shared on social media platforms like Facebook or LinkedIn. This is important because it provides clear context and an engaging headline for viewers.
For example, our page is missing an Open Graph Image, so it’ll appear in the Audit option. Let’s click on it, and a dialog box will appear to add the Open Graph image.
Then, add the image title or choose to keep it the same as the SEO title tag, and add an Open Graph meta description. Once you’re done, hit the ‘Save’ button.
Once you’ve made all the necessary changes, your page is ready to go live.
Similarly, you can go through other missing SEO optimizations that appear here.
D. Building a Site with Kirki
Now, we’ll look at how to build a site with Kirki. Follow the steps and see how easy it is.
Step 1: Purchase and Install Kirki
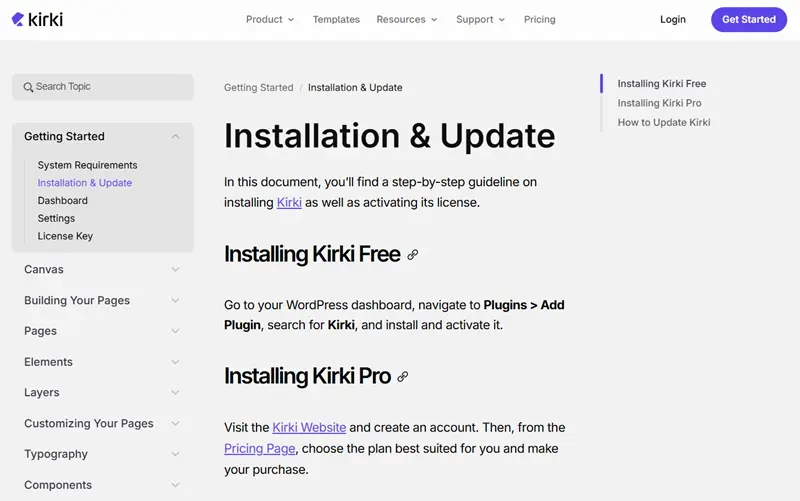
Kirki offers both free and Pro plans. To install the free version, go to your WordPress dashboard, head to ‘Plugins > Add New Plugins’, search for Kirki, then install and activate it.
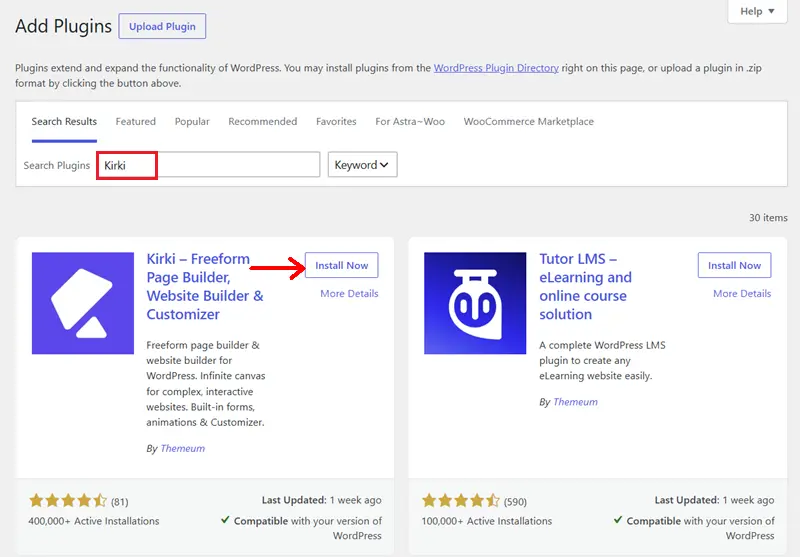
Here’s our complete tutorial on how to install a WordPress plugin.
Want Kirki Pro? Create an account on the Kirki website, then choose a Kirki Pro plan and purchase it.
Next, go to ‘Downloads’ and download the plugin.
Then return to your WordPress dashboard and go to ‘Plugins > Add New Plugins’. Click the ‘Upload’ button, choose the Kirki Pro zip file you downloaded, and hit ‘Install.’
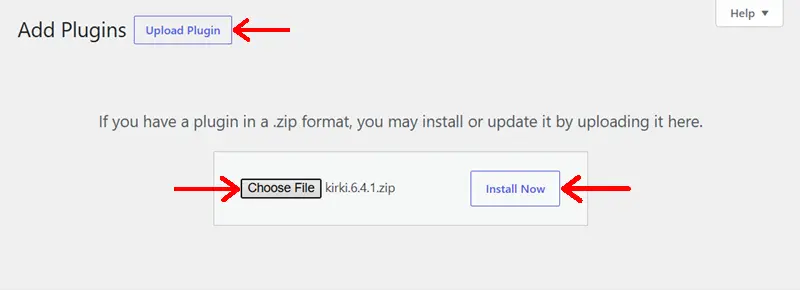
Right after installation, click the ‘Activate’ button on the next page.
Remember, even if you go for Kirki Pro, you need both the free and Pro plugins installed and activated on your WordPress site.
Once successfully installed and activated, you’ll see the Kirki menu in the left menu bar. Click it, then go to the ‘License’ tab. Here, you need to add your License Key.
To get the license key, go to the Kirki website and head to “Subscription > Licenses”, and hit the ‘Add Website’ button.
Following that, add your site URL and hit “Submit.” This will generate the license key for your site.
Copy and paste this back into the License Key field on your WordPress dashboard.
Then hit “Activate,” and it’s done!
Step 2: Configure the Kirki Settings
To make the most of your design and layout options in Kirki, ensure you enable certain controls in Kirki.
Go to your ‘WordPress dashboard > Kirki Dashboard> Settings’, and enable ‘Smooth Scroll’. This enhances scrolling by adding a gradual transition effect.
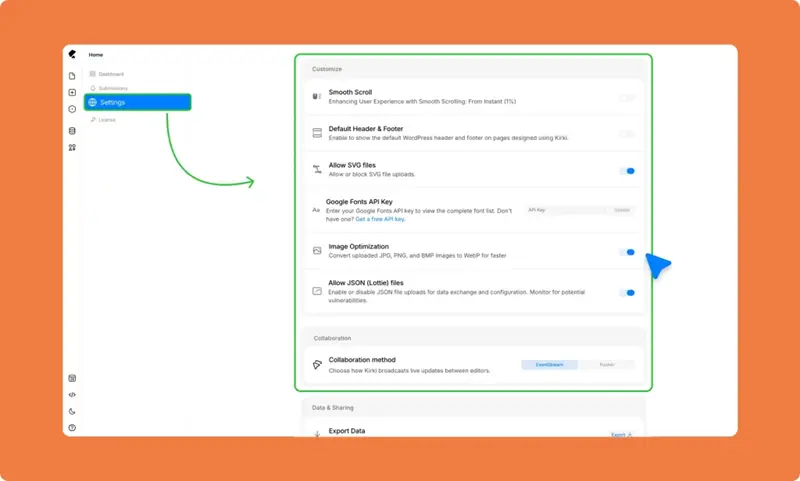
As we discussed before, you can also enable image optimization, SVG upload, and JSON file upload.
Also, notice the ‘Share View-Only Link’ option? This comes in handy for sharing progress or drafts with clients without granting them editing access.
Step 3: Create a New Page
Once you’re done with the setup, go back to the Kirki dashboard and click ‘New Page’. In the dropdown, you’ll see four options: New Page, Dynamic, Utility Page, and Popup. Select ‘New Page’ again. This opens the Kirki editor with a blank page.
Another way is to create a page from your WordPress dashboard. Go to ‘Pages’ and select ‘Add Page’. Give it a name and save it. Then click ‘Design with Kirki’ in the top bar.
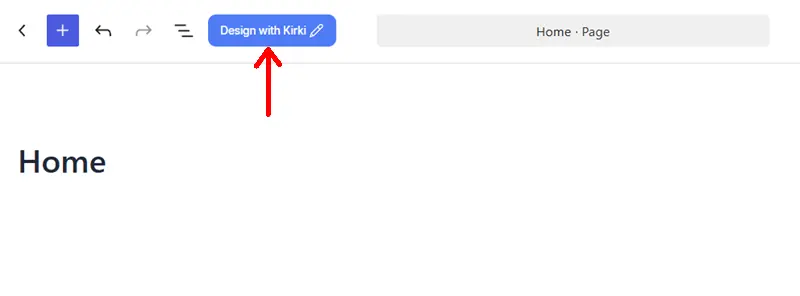
You can also create a post and edit it in the Kirki editor. Go to ‘WordPress Dashboard > Posts > Add Post’, add a title and content, then save it. After that, click ‘Design with Kirki’ in the top bar.
Step 4: Start Building and Customize
Once the editor is open, go to the Insert panel to start building. Choose from a library of prebuilt pages, blocks, and templates. Or, if you want to create something from scratch, start with ready-made or base elements.
For now, let’s drag and drop a page. To do so, click ‘Pages’ in the Insert panel and drag the one you want to use onto the page.
From here, you can customize it. Add or remove elements, then style them and the page itself using the options in the Right Panel. You can change layout, position, and size, and add backgrounds, strokes, shadows, glass effects, and more.
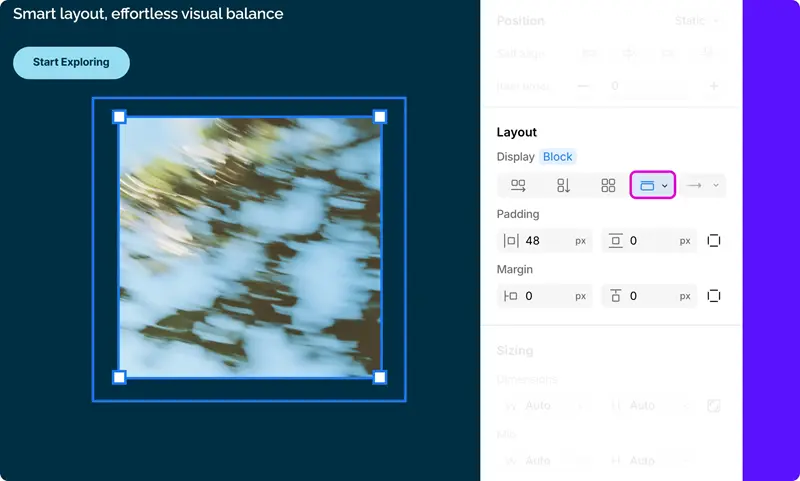
You can also add interactions and animations visually.
Posts work the same way, so edit your post in the editor just like any other page.
And that’s how you can create and edit your pages and posts using Kirki.
Step 5: Preview & Publish
You can preview the pages from the Kirki editor. To do so, simply hit the play button icon at the top right corner of the editor.
Before publishing, add your Meta and Open Graph details from the page settings. This helps control how your page appears in search results and when shared on social media.
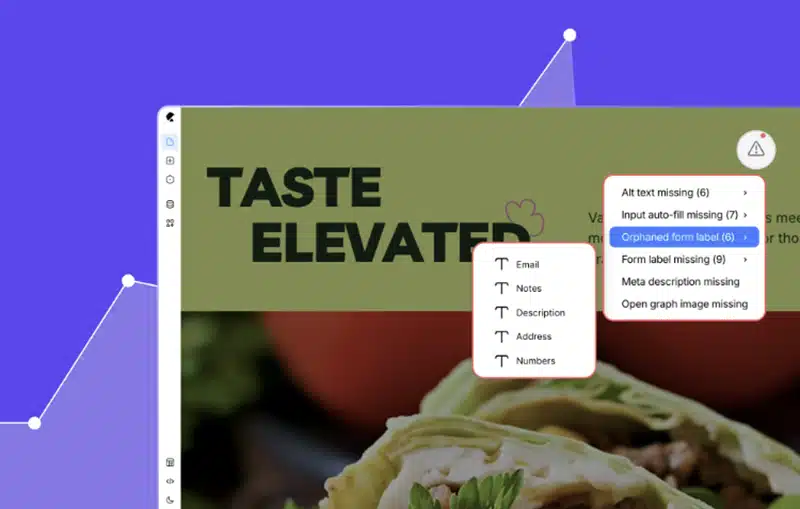
There is also an Audit feature that checks whether your site follows basic SEO practices. To enable it, click the Kirki logo at the top left corner, go to ‘Preferences’, and select ‘Show Audit’.
Once you’re satisfied, click the arrow icon next to Save and hit ‘Publish.’
And it’s done!
E. Pricing Plans of Kirki
Kirki is a freemium website builder plugin for WordPress. You can find the free plugin right on the WordPress.org plugin directory to download and add to your site. Otherwise, you can install it right on your admin area.
For its premium version, it offers a total of four pricing plans on its official website.
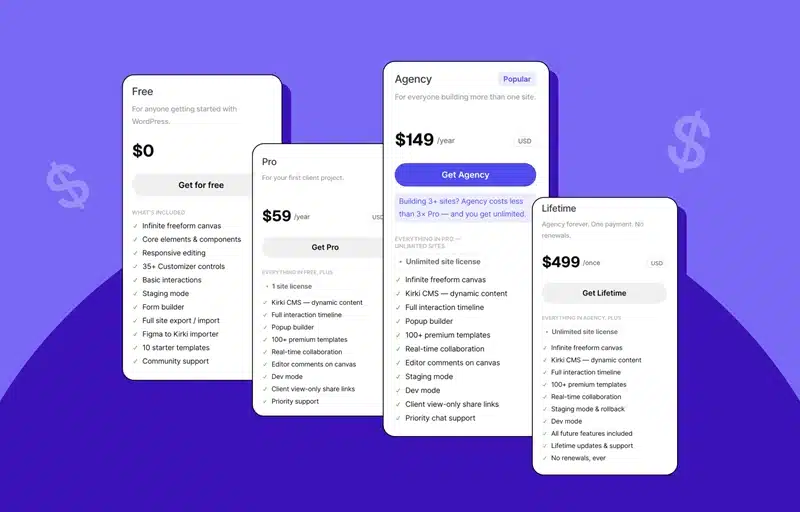
- Free: Costs $0 and is available on WordPress.org. It’s a good starting point for building a simple site, and includes the infinite freeform canvas, core elements, responsive editing with unlimited breakpoints, basic interactions, SEO, Figma to Kirki import, and more.
- Pro: Costs $59/year and unlocks everything Kirki has to offer. It’s ideal for your first client project, and you can use it on a single site.
- Agency: Costs $149/year and includes everything in Pro, with unlimited sites. It’s ideal for anyone building more than one site.
- Lifetime: Costs $499 as a one-time payment with no renewals. It includes everything in Pro, with unlimited sites and unlimited time, plus lifetime updates and support.
Not to mention, every paid plan is backed by a 60-day money-back guarantee, so you can try Kirki risk-free.
F. Customer Support Options
Kirki offers several ways to get help while you build your website. Here’s how you can connect with the team.
If you want personalized assistance, Kirki has a dedicated ticketing system. Log in to your Kirki account and submit a detailed support request there.
For general questions or information about Kirki’s services, visit the Contact Us page to fill out the form, or email the team directly at [email protected].
To suggest new features or improvements, head to the Feature Requests page. There you can propose ideas, vote on existing suggestions, and track the status of requested features.
You’ll also find detailed documentation and how-to blogs on the Kirki website, along with video tutorials and walkthroughs on the Kirki YouTube channel. Together, they cover everything from installation to creating a page to customizing every element on your website.
G. Kirki Alternatives
If you’re still not sure about Kirki, then there is always an alternate route. Let’s take a look at them.
1. 10Web AI Website Builder
10Web AI Website Builder is an AI-powered platform that lets you create fully functional WordPress websites quickly. By simply providing a brief description of your site, the AI generates a complete website, including layout, content, and images.

Moreover, the platform offers a drag-and-drop editor based on Elementor. So you can customize websites with ease. The AI Co-Pilot feature also assists in real-time editing. This lets you modify text, images, and layouts through simple chat prompts.
Key Features:
- Offers a staging environment for secure testing.
- Also, get white-labeling for a branded experience.
- Mobile-responsive and SEO-optimized designs.
- Free SSL certificate and advanced security measures.
- Optimize your agency workflow and manage multiple websites, clients, and projects within one dashboard.
Pricing:
10Web AI Website Builder offers several premium pricing plans to cater to different needs:
- AI Starter: $10/month – Suitable for simple websites with a 5K-word AI assistant limit.
- AI Premium: $15/month – Ideal for professional websites with a 50K-word AI assistant limit.
- AI Ultimate: $22.5/month – Designed for high-traffic websites with unlimited AI assistant usage.
2. Elementor Website Builder
Elementor is a powerful WordPress plugin for creating visually stunning and responsive websites. It offers a drag-and-drop interface and real-time editor, so you don’t need to have coding knowledge.

Moreover, it provides a comprehensive set of tools for designing every aspect of a website, including headers, footers, and dynamic content areas. With its huge library of widgets and templates, you can build custom layouts tailored to your specific needs.
Key Features:
- It has over 100 powerful WordPress widgets.
- Engage and convert website visitors with built-in marketing tools.
- Natively integrates with eCommerce to sell anything online.
- Has advanced WordPress design features like motion effects, interactions, CSS, and custom code.
- Dynamic tags and elements that auto-update any content changes in all of your Elementor widgets.
Pricing:
You can get the free version of this plugin from the official plugin repository of WordPress.org or install it from the WordPress dashboard.
Besides, Elementor offers several premium pricing plans to cater to different user needs:
- Essential: $5/year for 1 website, includes 50+ Pro widgets, Theme Builder, and basic marketing tools.
- Advanced Solo: $7/year for 1 website, 86 Pro widgets, Theme Builder, popup builder, etc.
- Advanced: $9/year for 3 websites, with Ecommerce features, collaboration notes, dynamic content, and more.
- Expert: $15/year for 25 sites, including WC dynamic tags, global widgets, role manager, and more.
Each plan comes with a 30-day money-back guarantee.
3. Beaver Builder
Next is Beaver Builder, another powerful WordPress page builder plugin that allows you to easily create custom websites. You can choose from various pre-designed templates and customizable layouts. Plus, this plugin works well with popular WordPress themes and plugins.

Additionally, the plugin is developer-friendly, offering clean code and the ability to create custom modules. Its compatibility with WooCommerce makes it a suitable choice for e-commerce websites as well.
Key Features:
- Includes templates for contact pages, newsletter sign-ups, about pages, pricing tables, and more.
- Offers advanced analytics, eCommerce solutions, marketing automation, and more.
- Engage your visitors with live chat, social feeds, forms, etc.
- Customize every aspect of your site, from the layout of your pages to fonts and colors.
- Also, it’s compatible with most WordPress themes and plugins.
Pricing:
Beaver Builder also offers a free version that’s available to download from the official plugin directory of WordPress.org.
Beaver Builder offers 3 premium pricing plans on its official site.
- Starter: $89/year for one site, including the page builder plugin, Beaver Builder theme, and Beaver Themer.
- Plus: $179/year for 3 sites, including Beaver Builder AI, and all Starter plan features.
- Professional: $299/year for up to 50 sites, including multisite support, network settings, and more.
- Agency: $546/year for unlimited sites, including white labeling, priority email support, Assistant PRO, etc.
Also, you’ll get a 30-day money-back guarantee if you change your mind.
Final Verdict – Is Kirki Worth it?
After using the plugin ourselves, we can say that Kirki is a powerful WordPress website builder. Its infinite canvas, side-by-side breakpoint views, and template library, along with advanced tools like the Dynamic Content Manager and Real-time Collaboration, make it an all-in-one builder that removes the need for extra plugins and complex code.
What’s best?
- Build and customize your website visually without writing a single line of code.
- Convert a Figma design into a fully responsive, pixel-perfect website using Figma to Kirki.
- Experience modern website building with an infinite canvas, side-by-side breakpoint views, and granular design freedom.
- Easily manage blogs, team pages, and more with the built-in Content Manager.
- Create forms and popups, visually craft complex animations, and collaborate on the same page in real time, all without extra plugins.
- Boost your site’s visibility with built-in SEO and Open Graph settings – even for dynamic single-item pages.
And yet there’s plenty more to explore with Kirki.
To sum up, if you’re looking for a versatile, efficient website builder to launch your site, give Kirki a try. It’s well worth it.
Frequently Asked Questions (FAQs)
1. Can I collaborate with my team in real-time using Kirki?
Yes, Kirki lets you collaborate with your team in real time. You can view and co-edit the same page, leave feedback exactly where the issue is with In-Canvas Comments, and work with confidence knowing you can restore any earlier version from Publish History.
2. Does Kirki support multilingual website creation?
As you use it within the WordPress environment as a website builder plugin, yes, it’s compatible with WordPress’s multilingual plugins.
3. Is it possible to create custom post types with Kirki?
Yes! Kirki’s built-in Dynamic Content Manager lets you create and manage custom post types, like portfolios, testimonials, or team members.
4. How does Kirki handle website backups and version control?
Kirki has built-in Publish History for version control, so you can restore earlier versions of your page if something goes wrong. And for full-site backups, you can use Kirki’s Project Export feature, a backup plugin like UpdraftPlus, or your hosting provider’s backup services.
Conclusion
That’s all for now! Hopefully, you liked our Kirki review.
In summary, Kirki is a compelling option for building a website. Its user-friendly interface and robust suite of tools make it easy to design, collaborate, and launch a site all in one place.
If you have any further questions about Kirki, please comment below. We’ll try to get back to you as soon as possible.
Also, let us know if you’re using Kirki, and share your experience with us in the comments section below.
You may also like our article on the best website builders and the best portfolio website builders.
If you like this article, then please share it with your friends and colleagues.


Leave a Reply